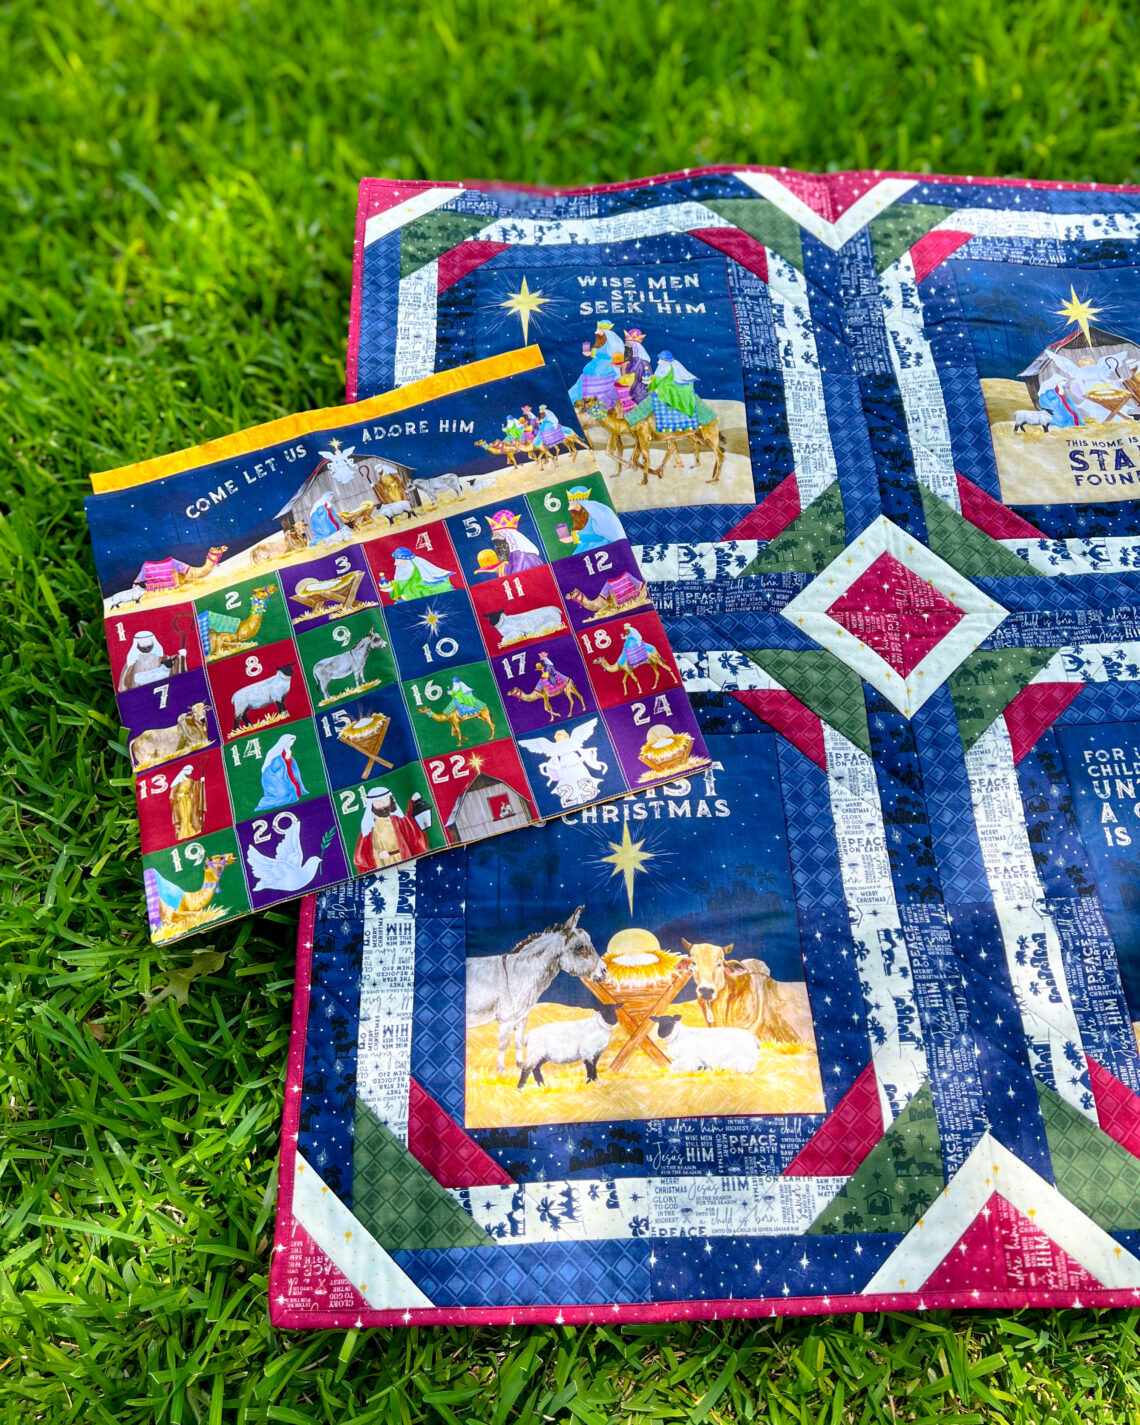
Come Let Us Adore Him – Panel Quilt: Step-by-Step Tutorial
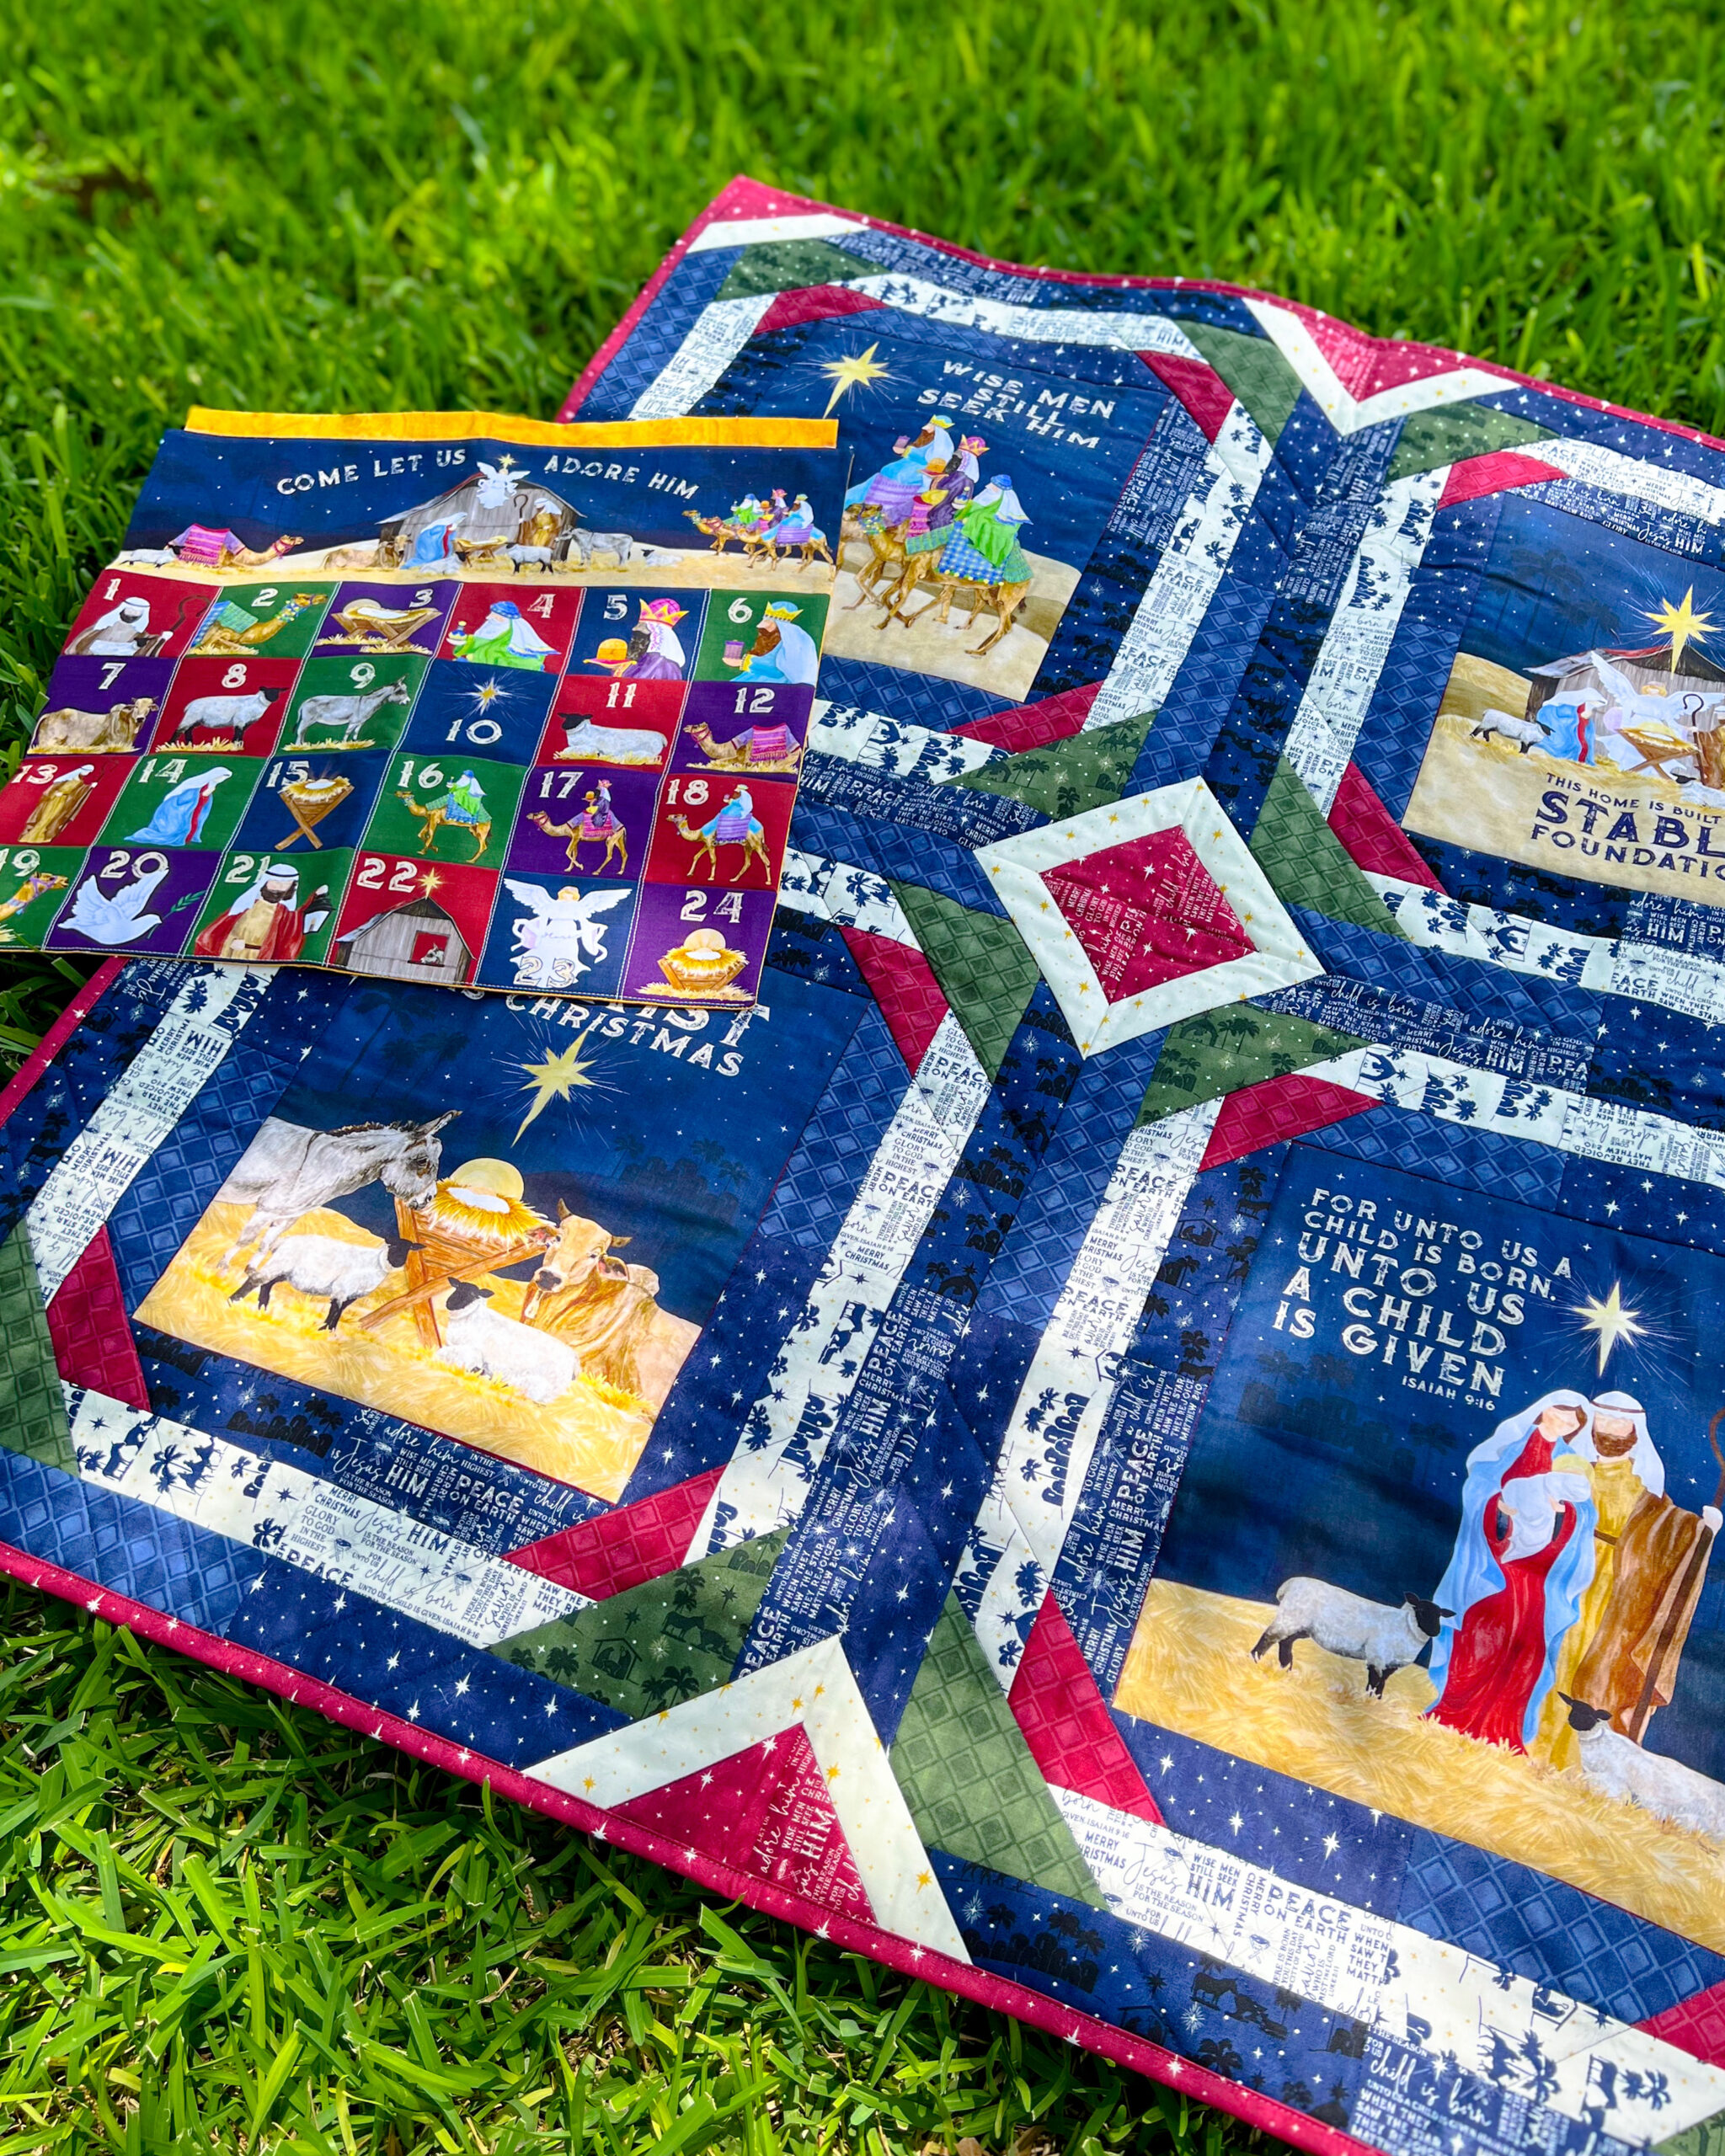
Are you ready to create a stunning panel quilt? The Come Let Us Adore Him collection by Tara Reed offers a perfect opportunity to create a stunning panel quilt. Tara Reed exquisitely painted several scenes that are beautifully showcased within this striking quilt. In this blog post, I will guide you through making your own panel quilt. With the process similar in construction as a courthouse steps block around the printed panels.
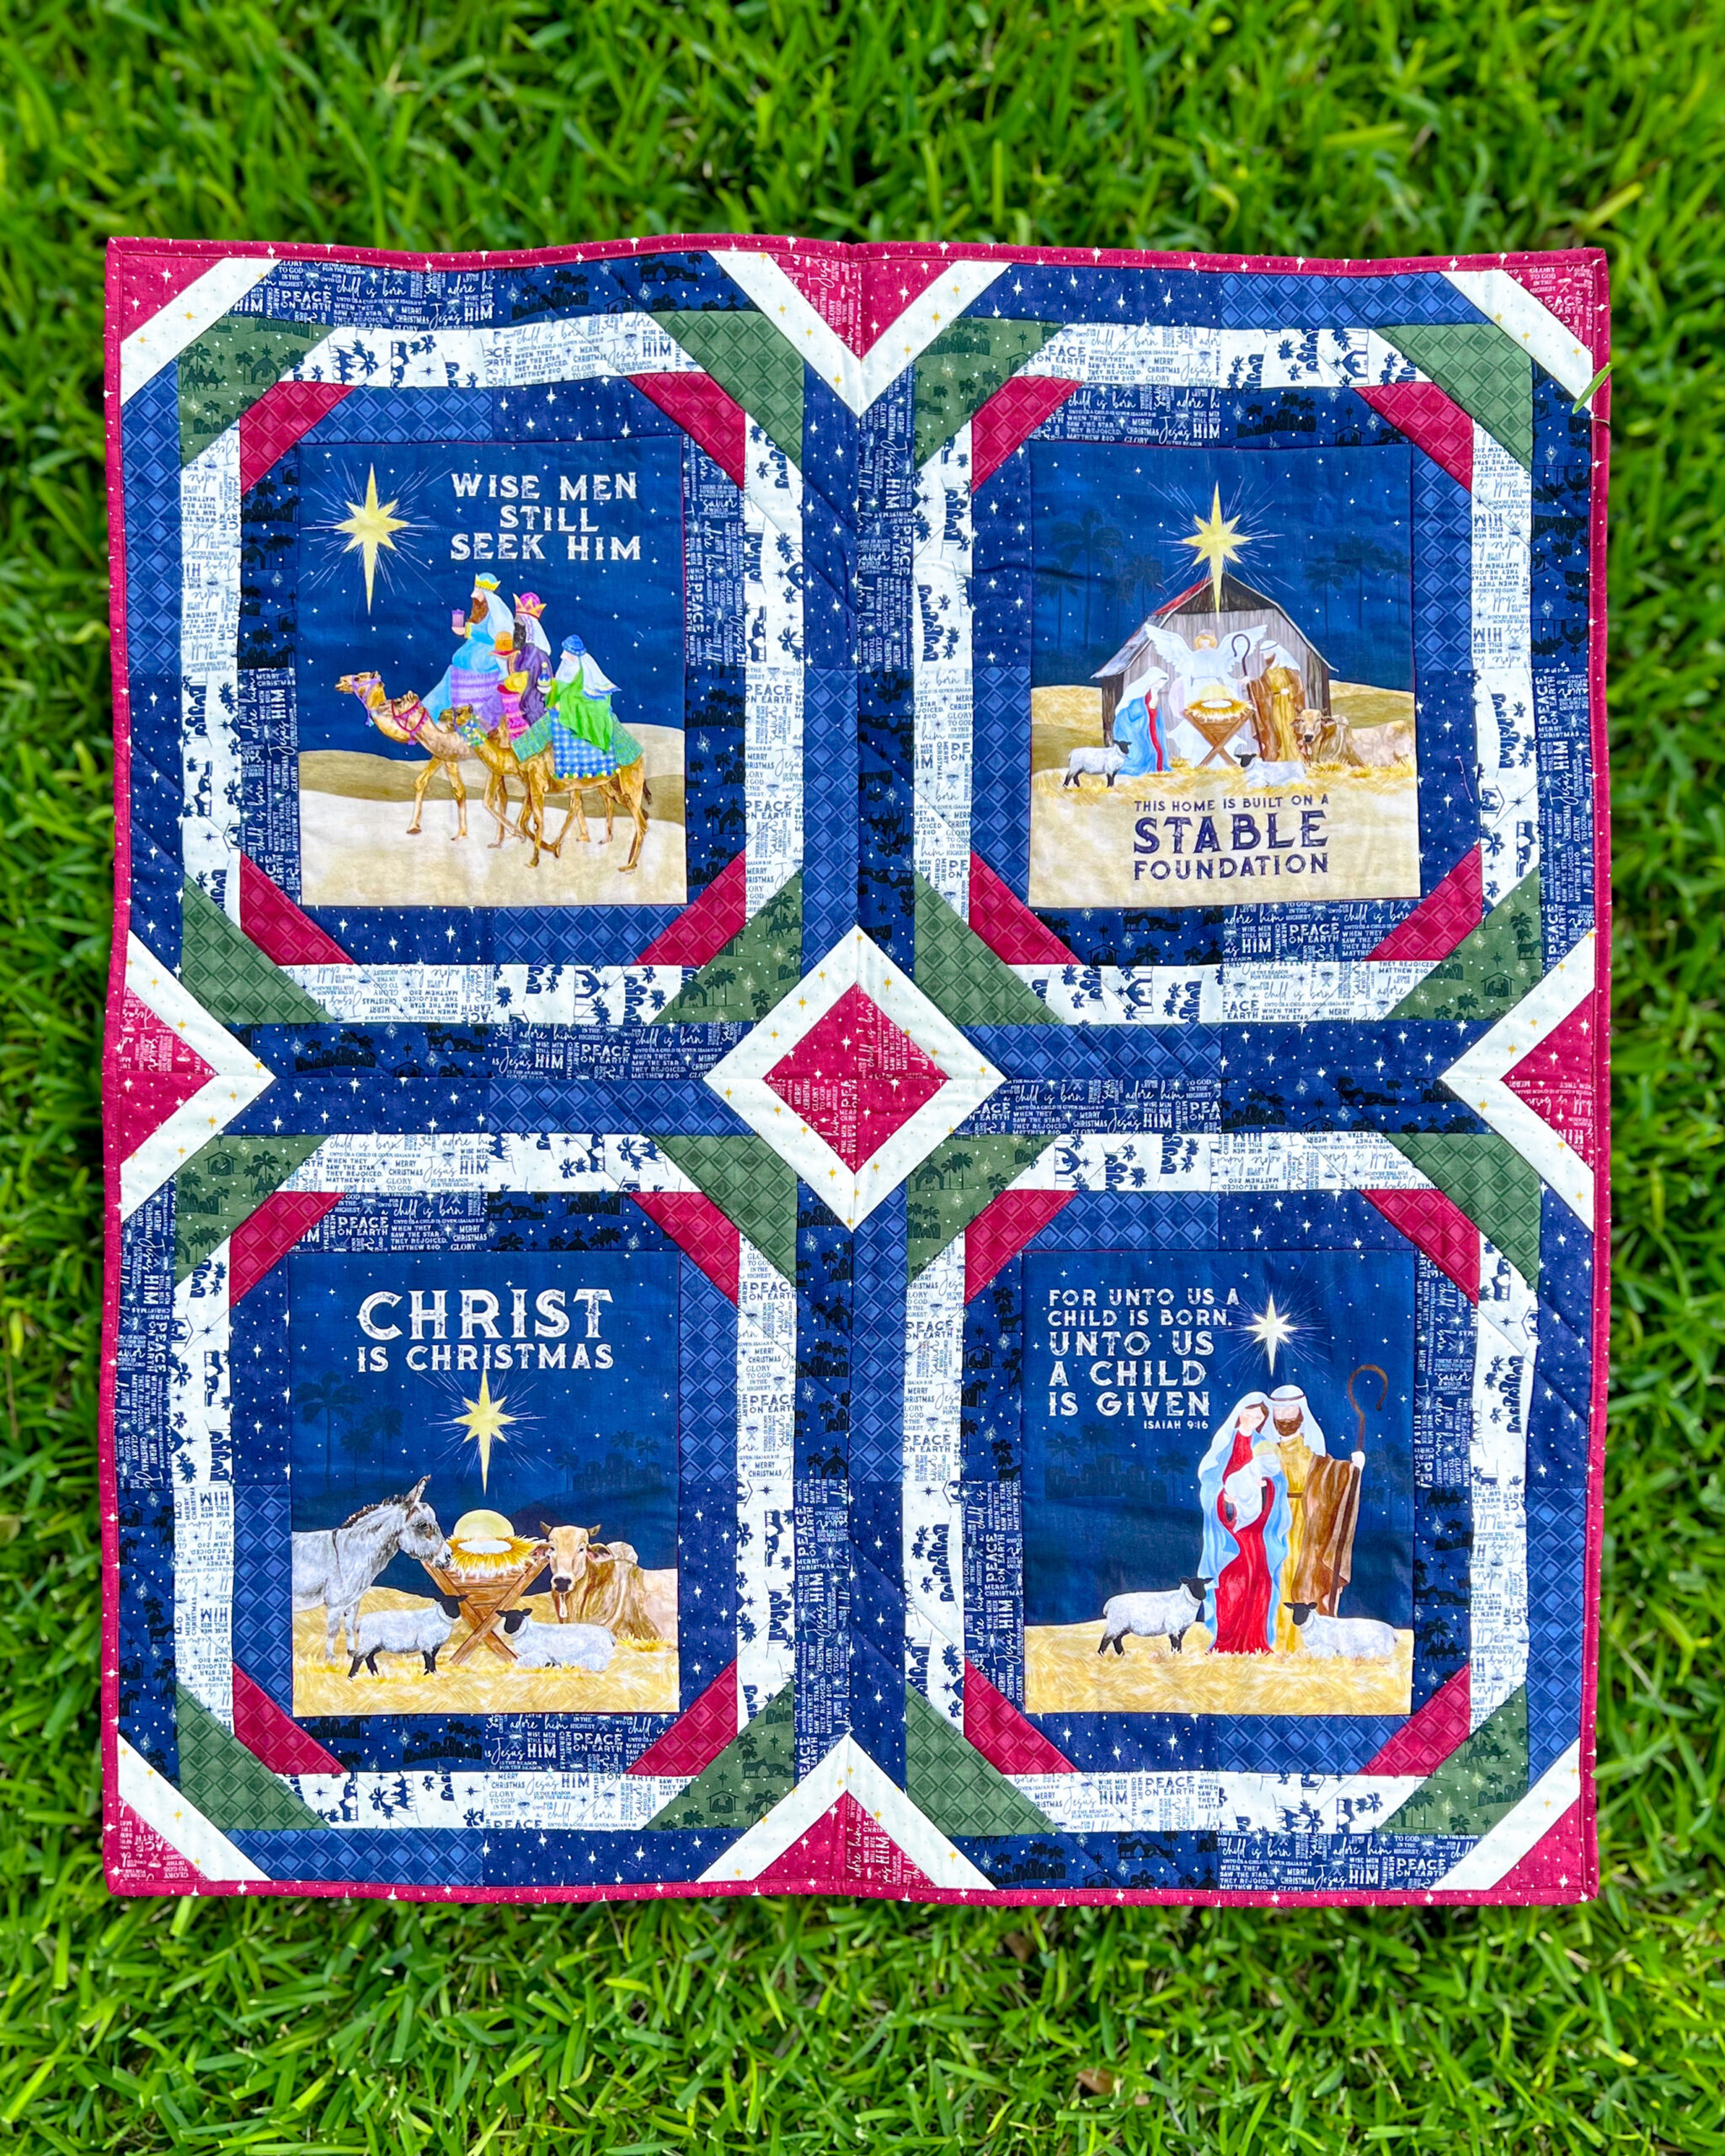
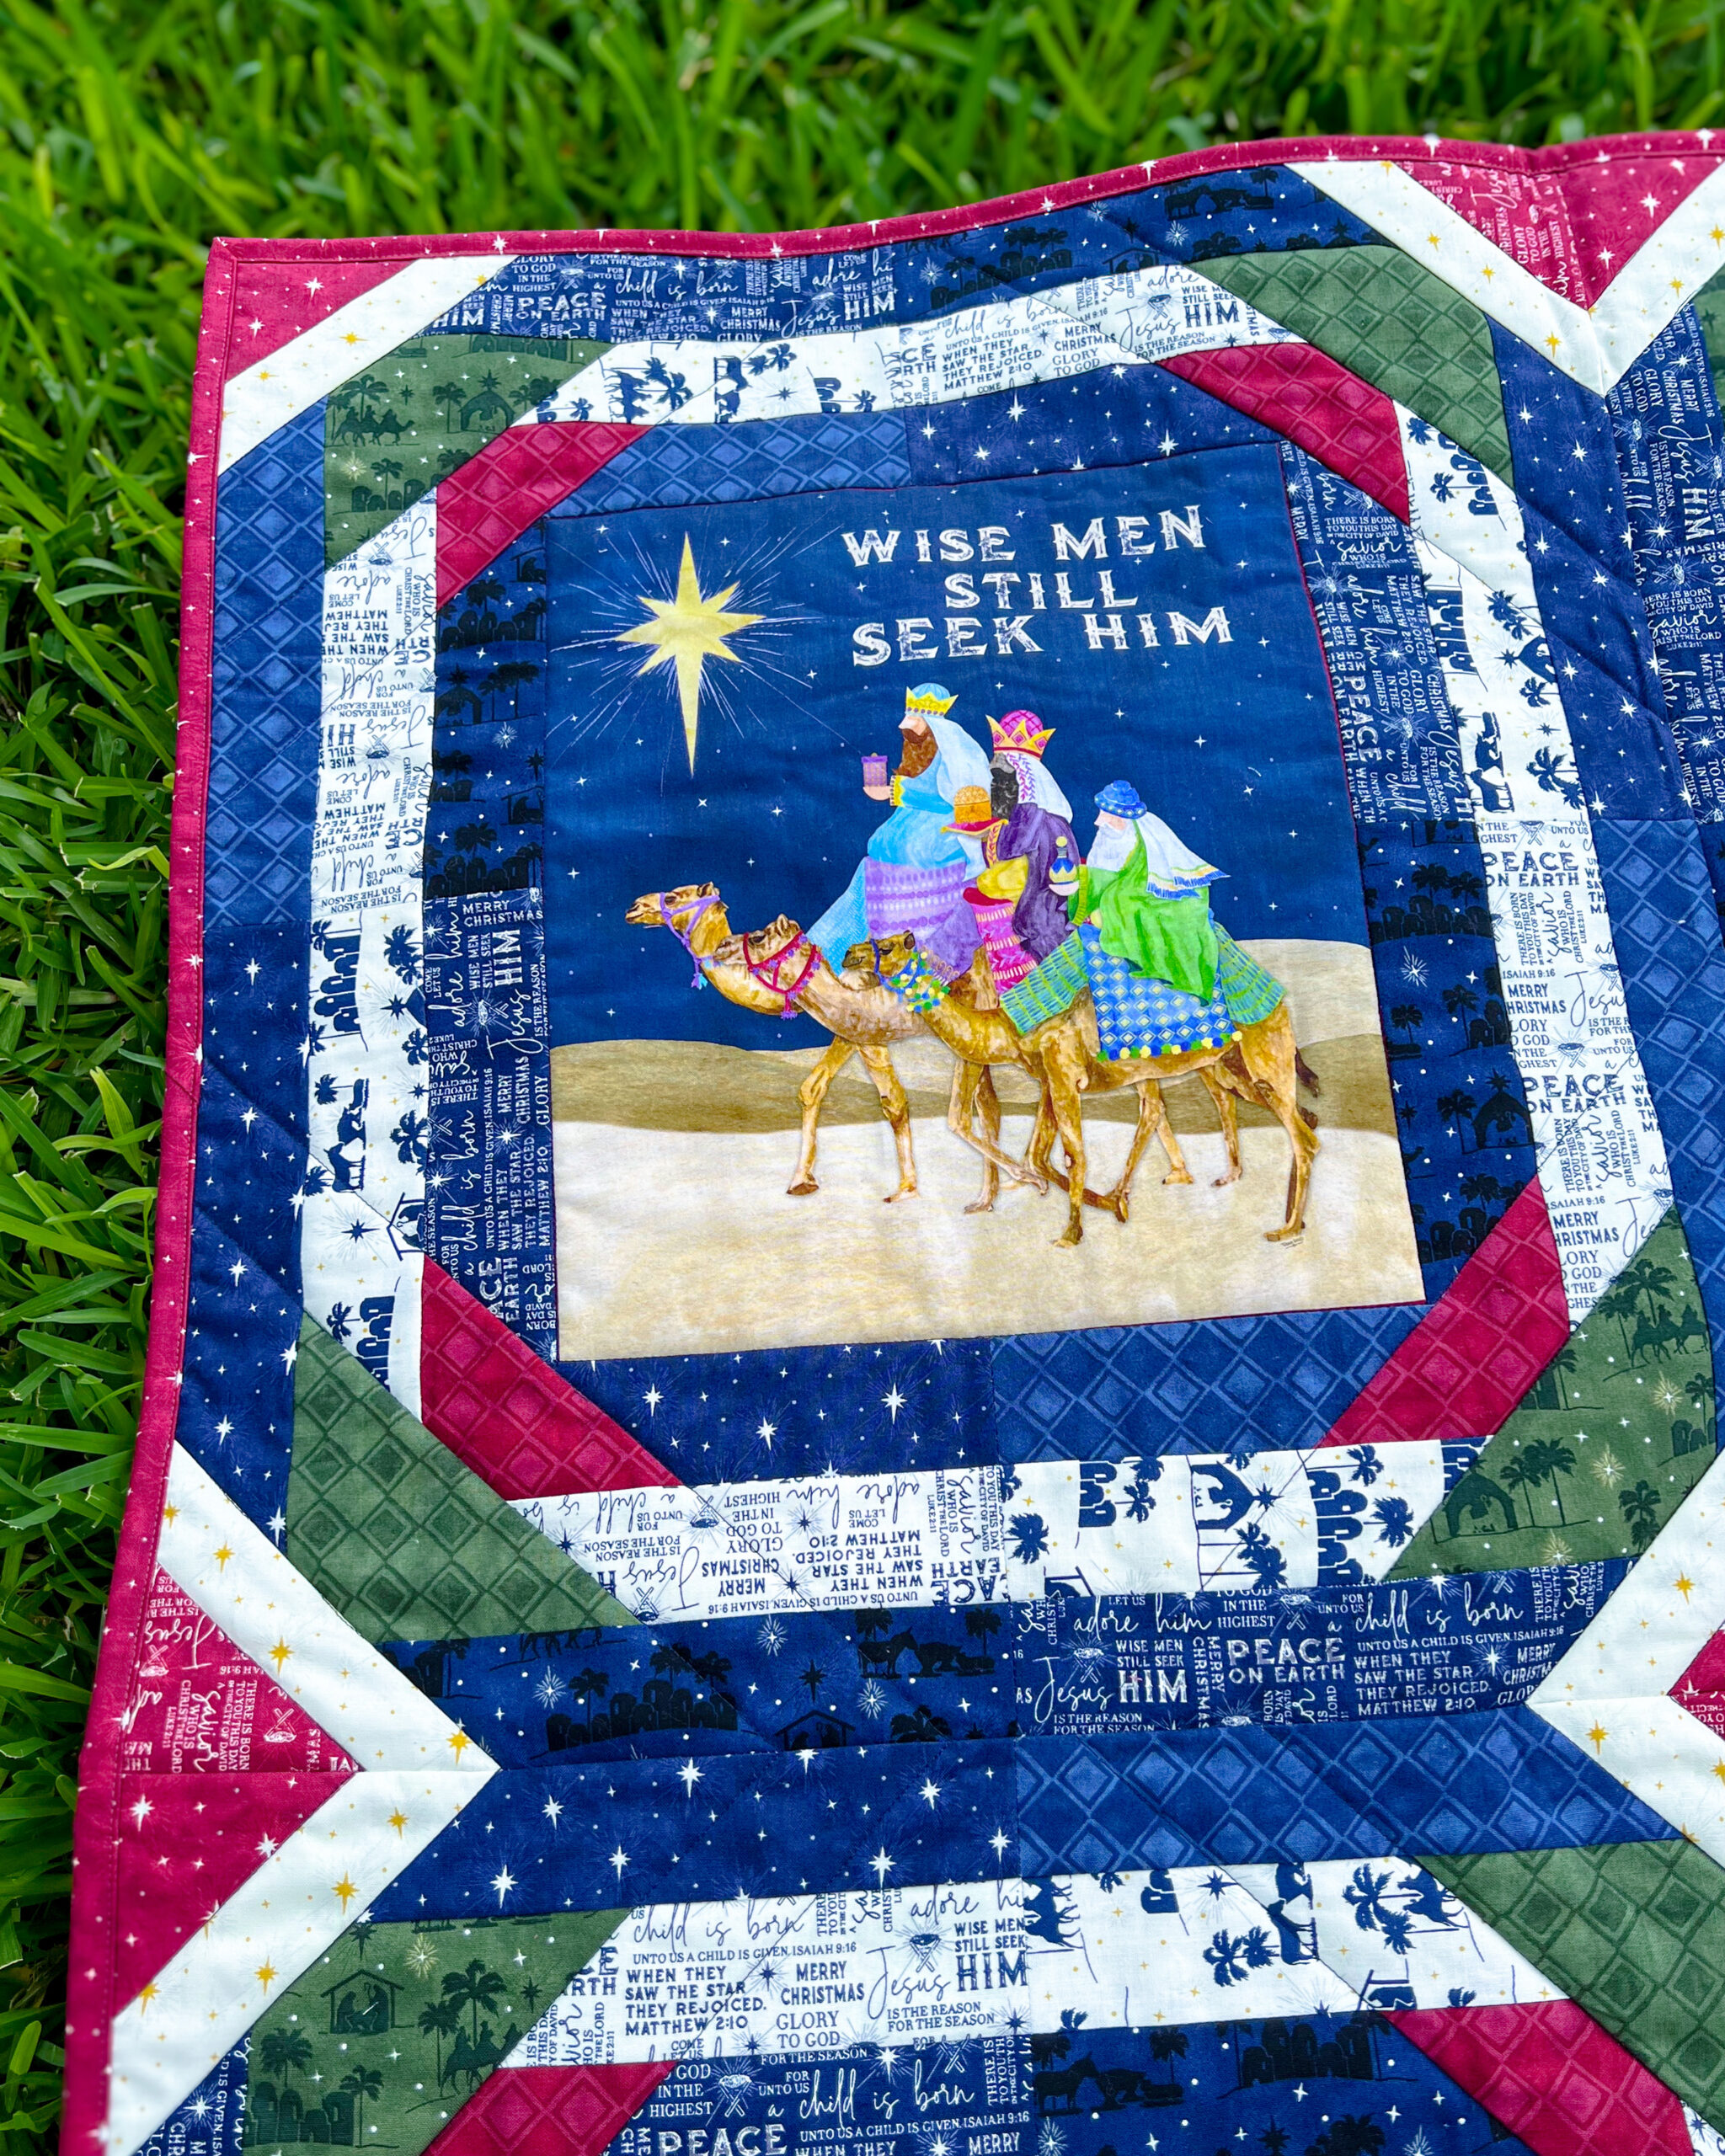
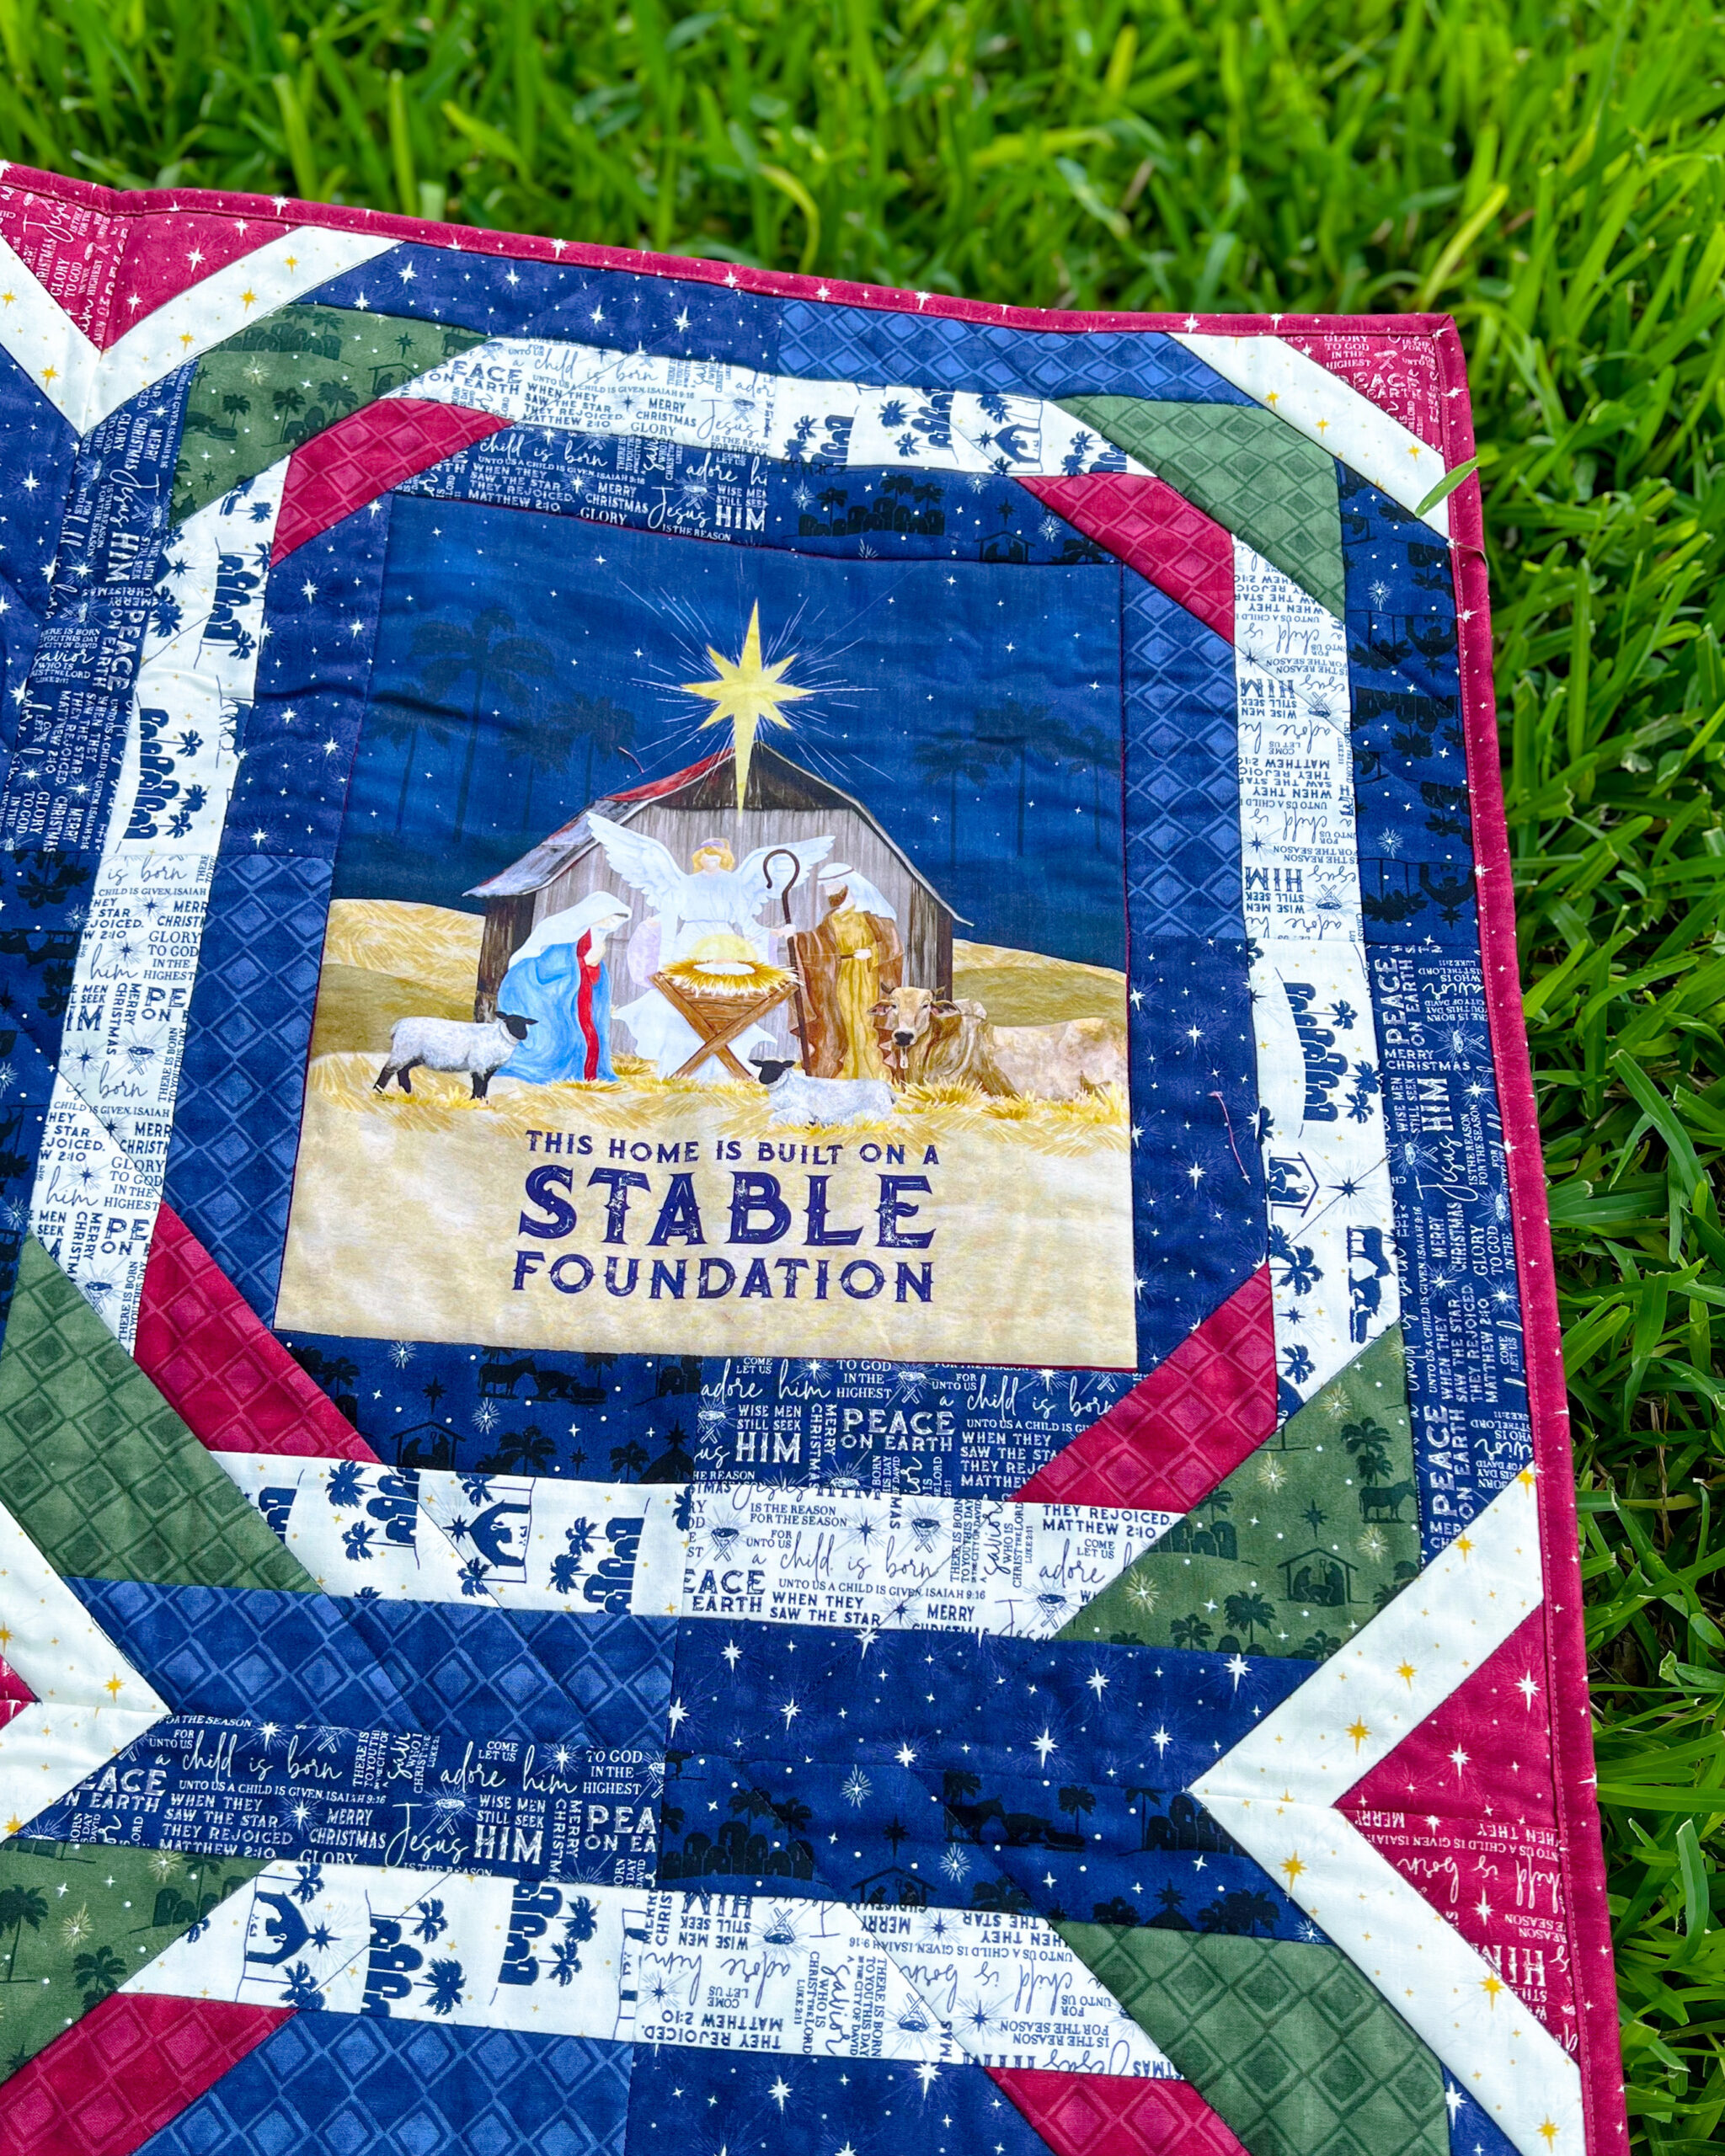
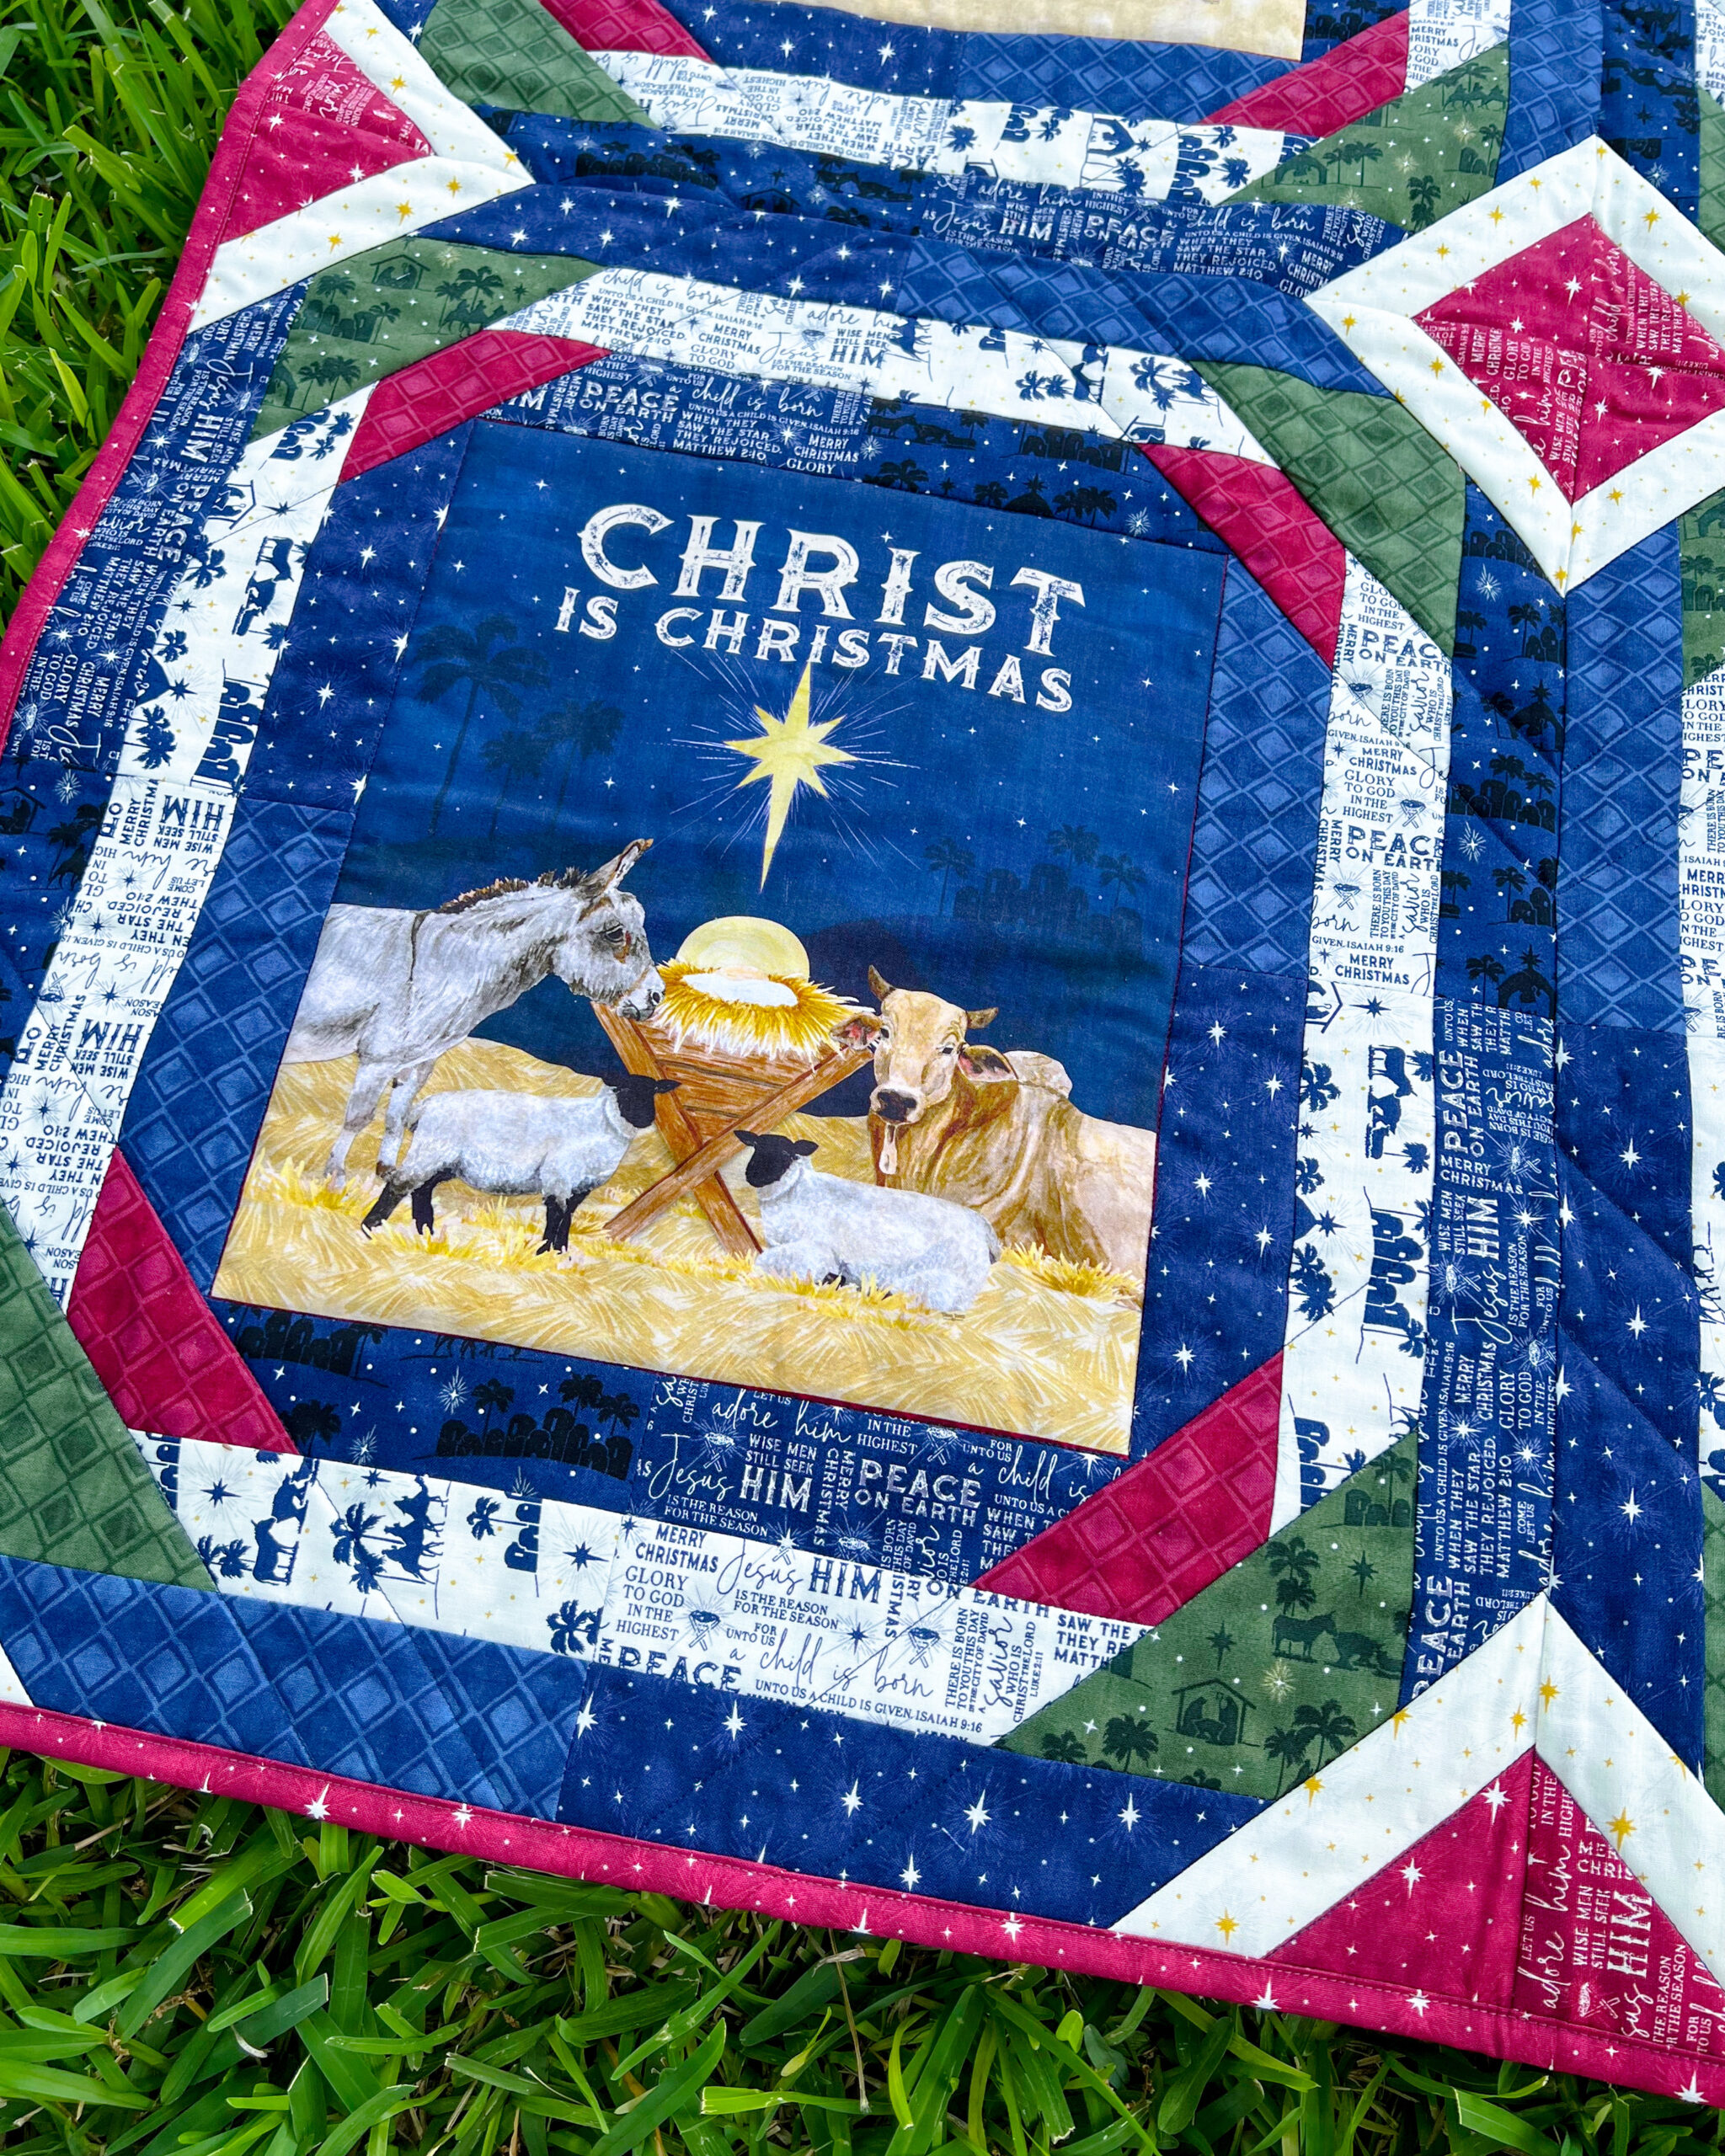
Hey there it’s Kelly Renay here! The key elements of this project is the panels from the Come Let Us Adore Him collection. These four panels serve as the focal points of your quilt, which feature the beautifully designed scenes that we are all familiar with.
Choosing Complementary Fabrics
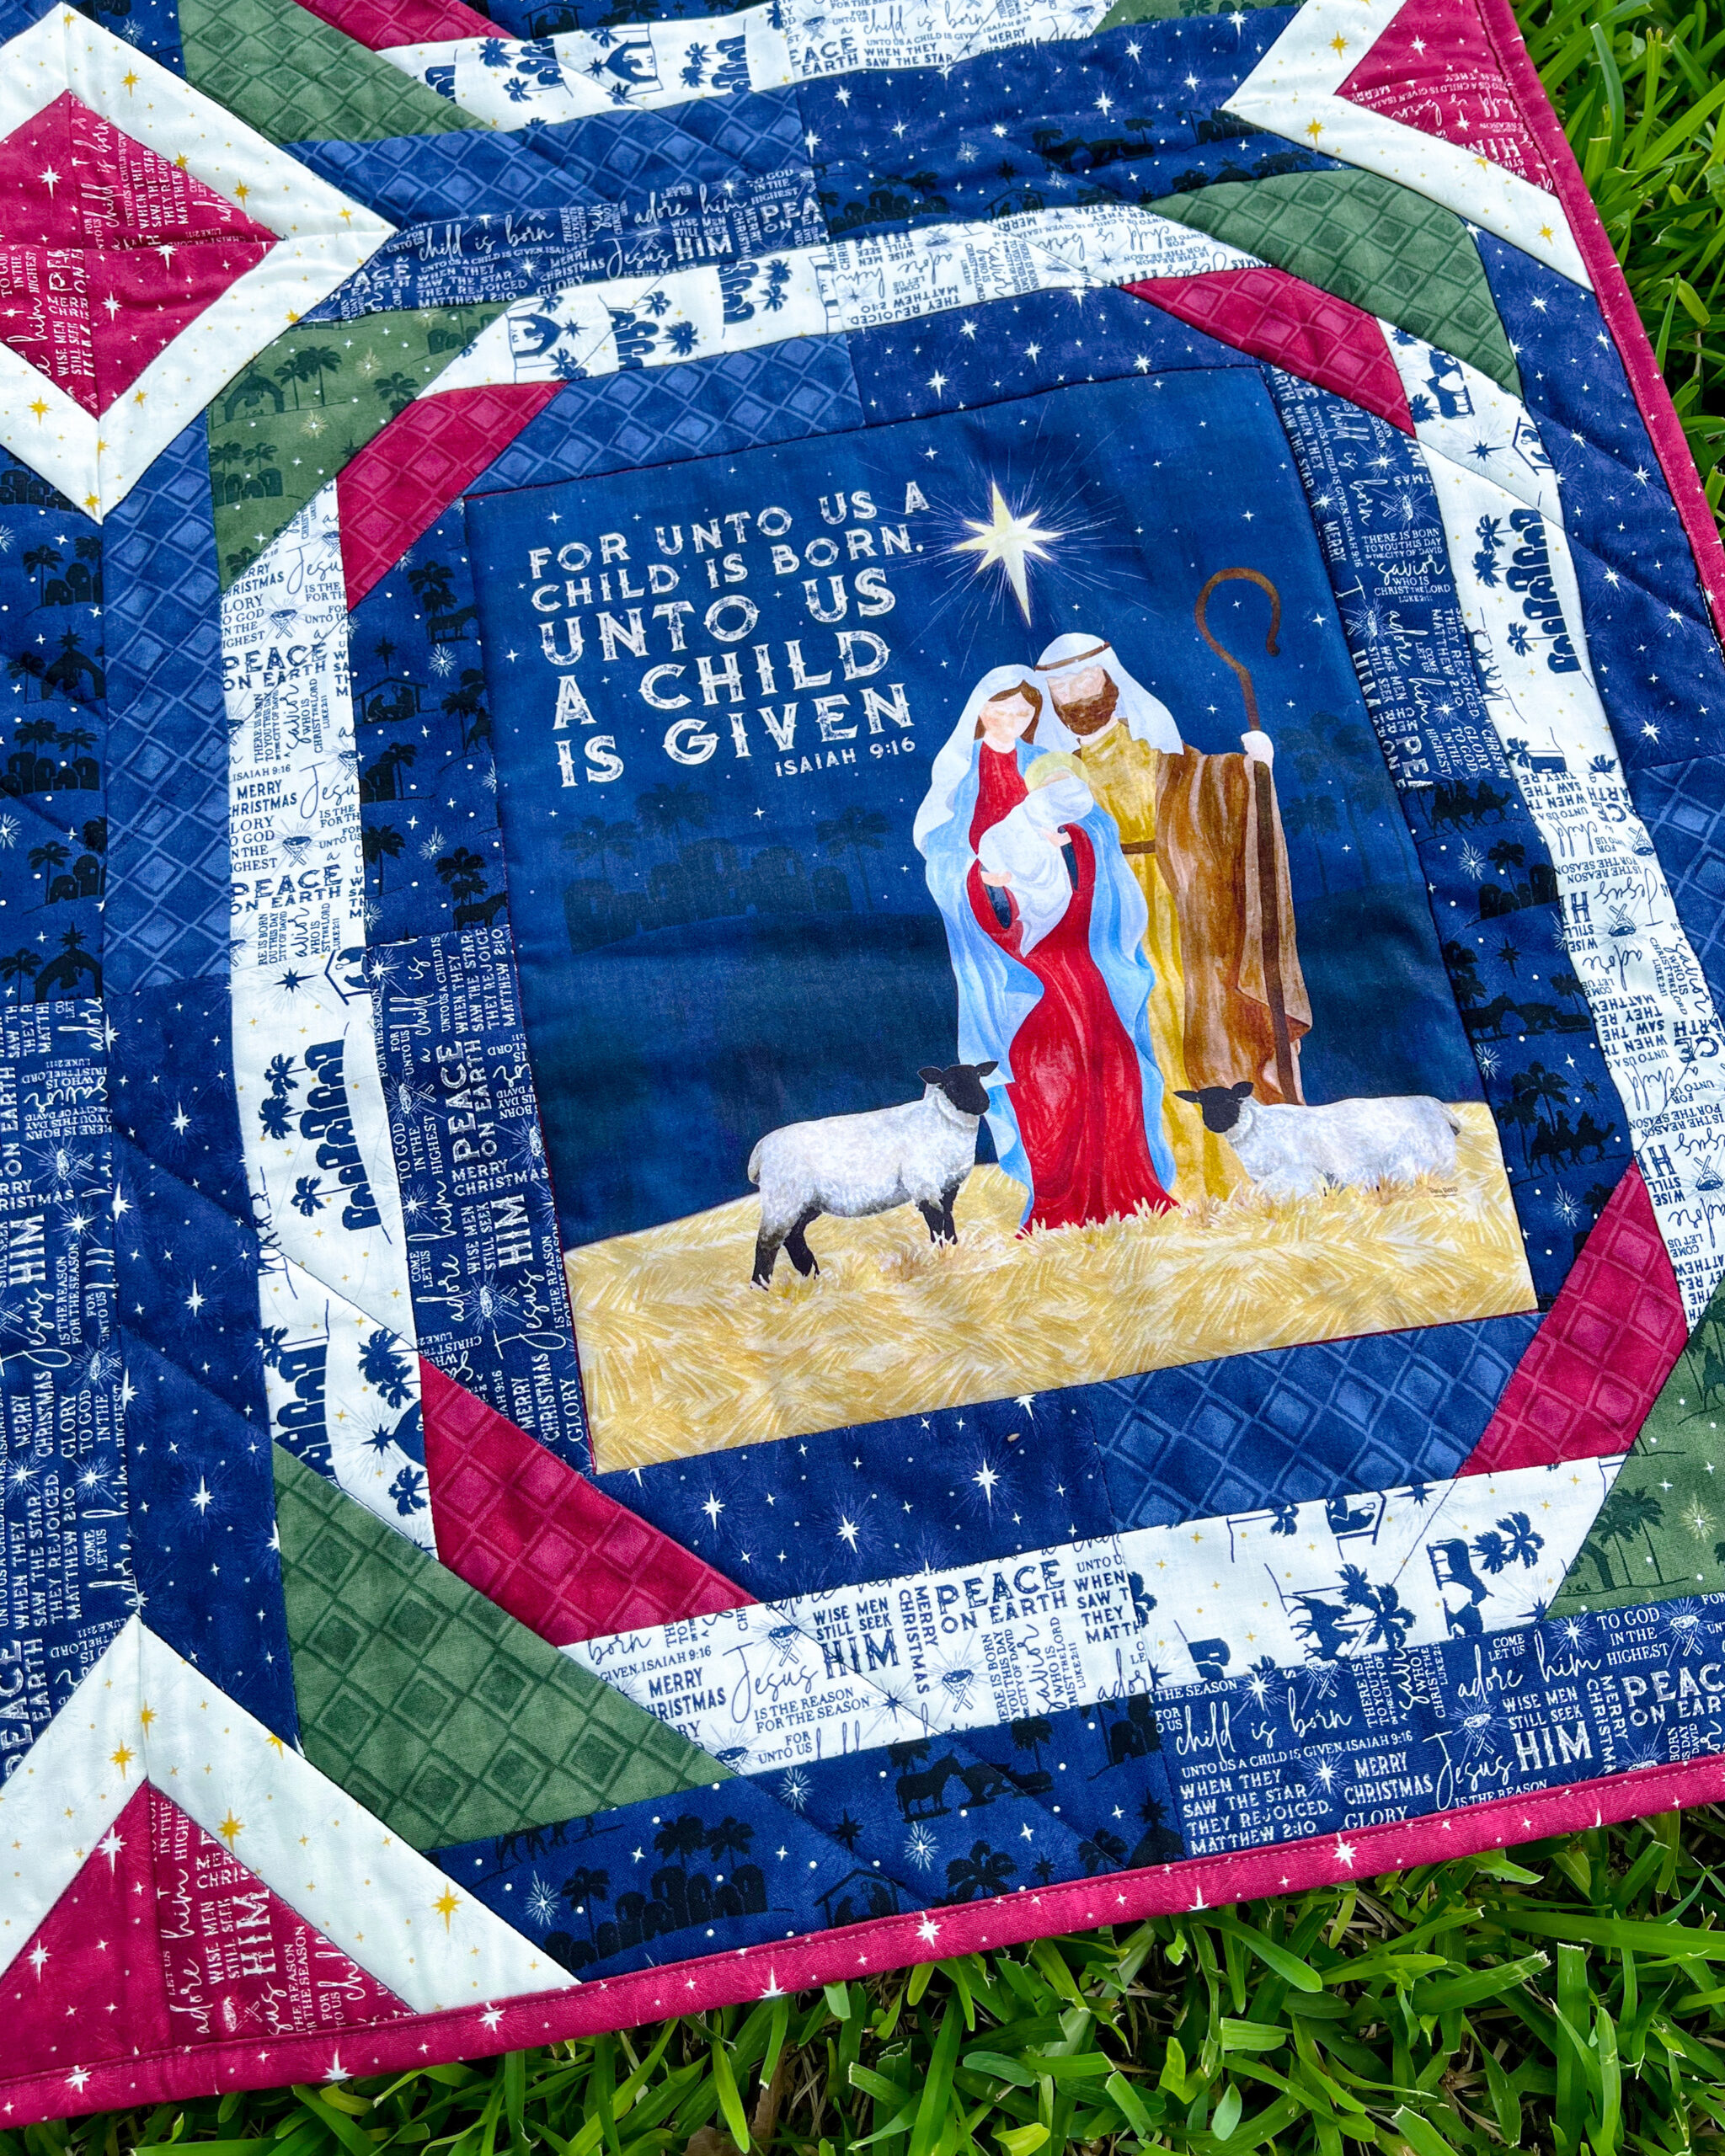
When selecting fabrics to complement the panels, consider pulling colors from the design to create a cohesive look. The Come Let Us Adore Him collection includes some simple designs that complement the panels perfectly, so the panels are the main feature. Aiming for a balance between the colors in the panels and the surrounding fabrics, I selected the four navy prints to highlight the most around the panels. Then to break up the darkness, I selected three cloud “white” prints to add in as a separation between the navy borders. And, finally to ensure a harmonious composition I added in a few of the green and wine prints.
Preparing the Panels
Once you have chosen your fabrics, it’s time to prepare the panels for the quilt. Start by cutting the panels to the desired size, of 10-1/2″ x 12-1/2″, leaving the wine colored seam allowance around the edges. This will ensure that the panel fits seamlessly into the quilt design.
Measure and Cut Carefully
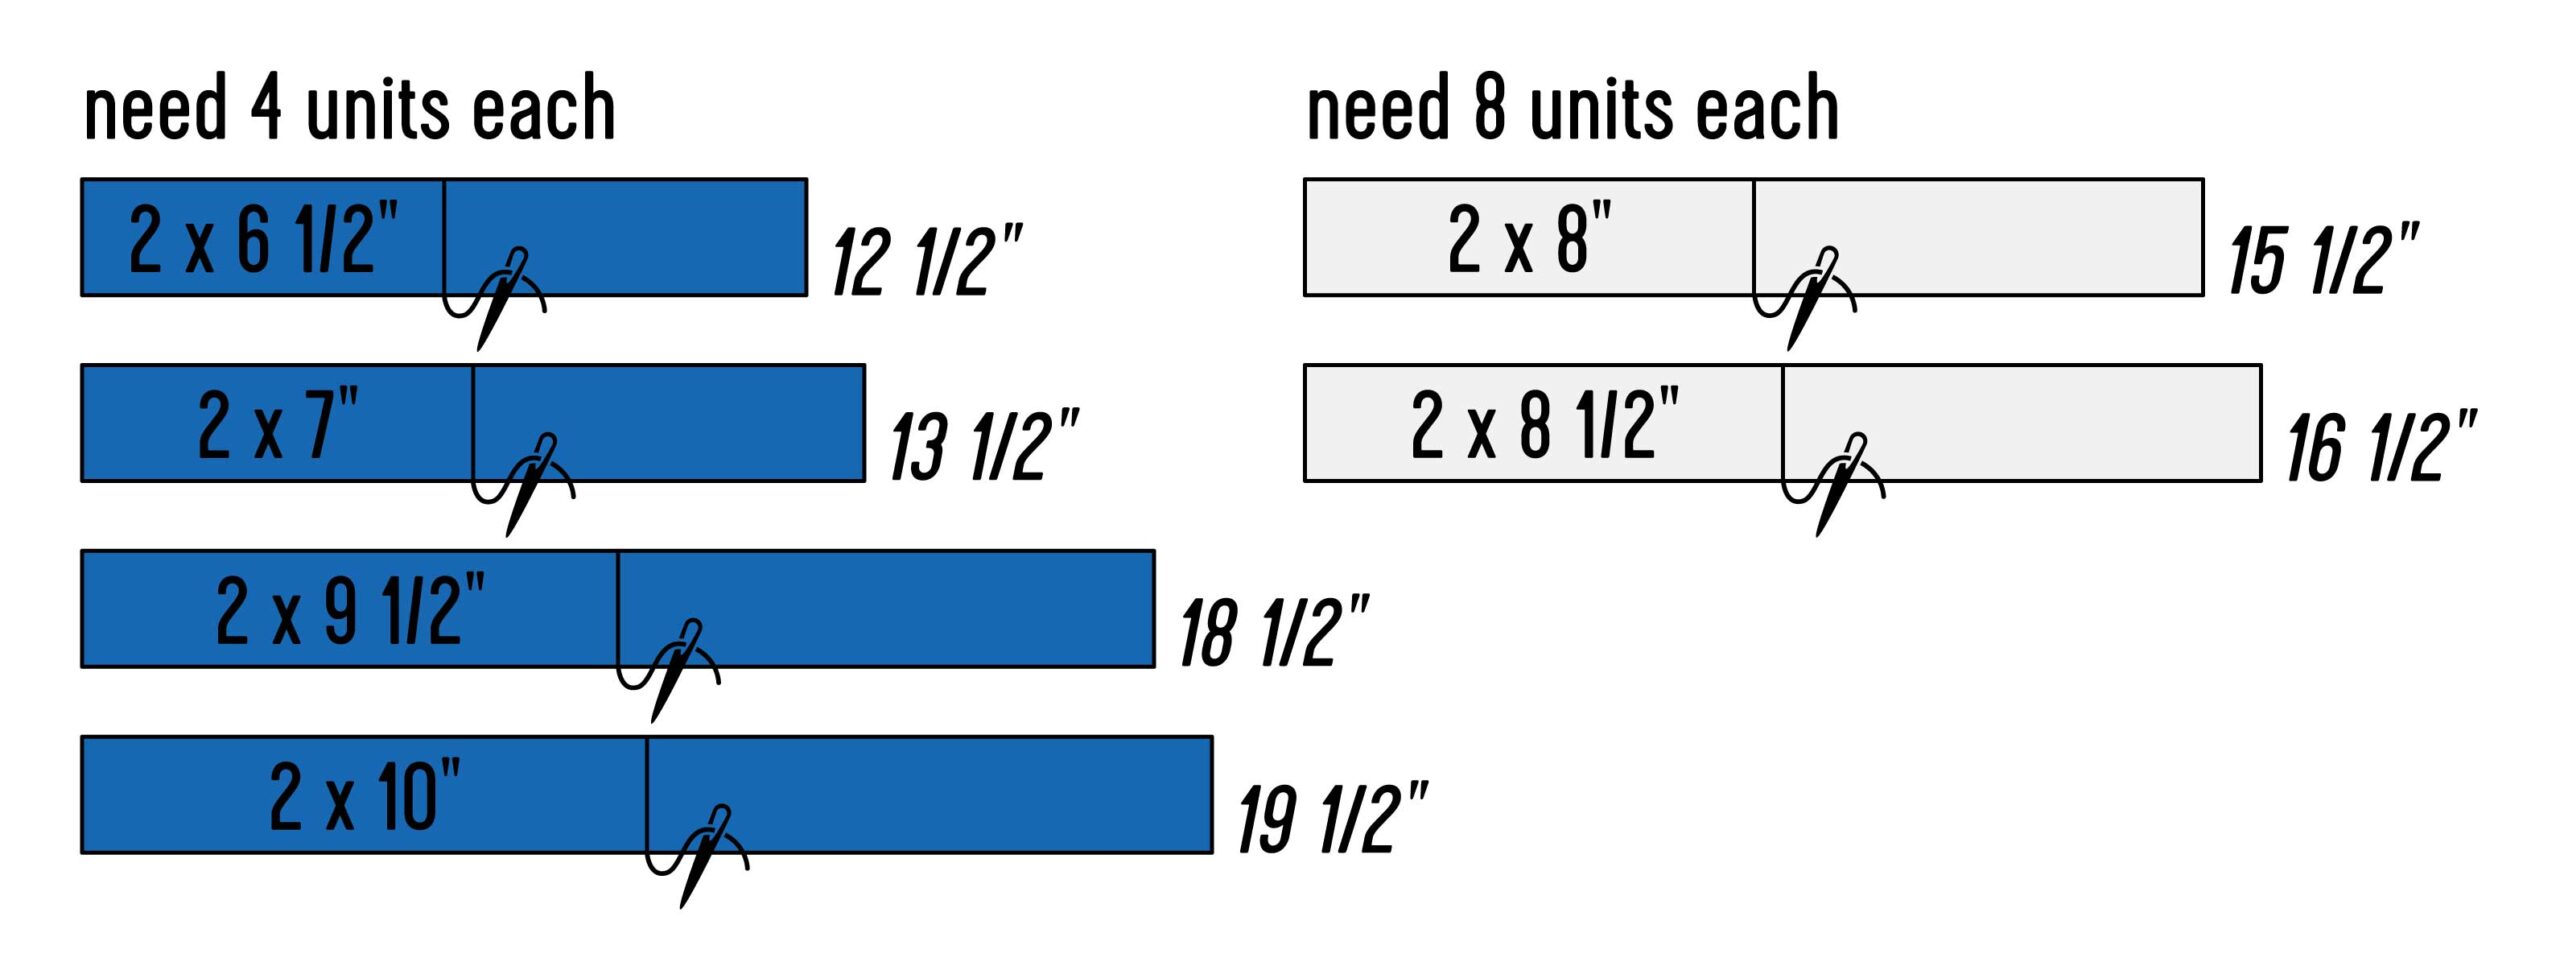
Take the time to measure and cut your fabrics accurately to ensure that everything lines up perfectly. Pay attention to quantities and fabric placement.
| Fabric Name/Color | Cut Piece Sizes | # Pieces Needed |
|---|---|---|
| SILHOUETTES NAVY | 2″ x 6-1/2″ | 4 |
| SILHOUETTES NAVY | 2″ x 7″ | 4 |
| SILHOUETTES NAVY | 2″ x 9-1/2″ | 4 |
| SILHOUETTES NAVY | 2″ x 10″ | 4 |
| TEXT NAVY | 2″ x 6-1/2″ | 4 |
| TEXT NAVY | 2″ x 7″ | 4 |
| TEXT NAVY | 2″ x 9-1/2″ | 4 |
| TEXT NAVY | 2″ x 10″ | 4 |
| TONAL NAVY | 2″ x 6-1/2″ | 4 |
| TONAL NAVY | 2″ x 7″ | 4 |
| TONAL NAVY | 2″ x 9-1/2″ | 4 |
| TONAL NAVY | 2″ x 10″ | 4 |
| STARS NAVY | 2″ x 6-1/2″ | 4 |
| STARS NAVY | 2″ x 7″ | 4 |
| STARS NAVY | 2″ x 9-1/2″ | 4 |
| STARS NAVY | 2″ x 10″ | 4 |
| SILHOUETTES CLOUD | 2″ x 8″ | 8 |
| SILHOUETTES CLOUD | 2″ x 8-1/2″ | 8 |
| TEXT CLOUD | 2″ x 8″ | 8 |
| TEXT CLOUD | 2″ x 8-1/2″ | 8 |
| STARS CLOUD | 4-1/2″ x 4-1/2″ | 16 |
| SILHOUETTES GREEN | 4-1/2″ x 4-1/2″ | 8 |
| TONAL GREEN | 4-1/2″ x 4-1/2″ | 8 |
| TONAL WINE | 3-1/2″ x 3-1/2″ | 16 |
| TEXT WINE | 3″ x 3″ | 8 |
| STARS WINE | 3″ x 3″ | 8 |
Constructing the Quilt Blocks
The construction of the quilt blocks involves sewing strips of fabric together and around a central panels outward, with stitch and flip “snowball” corners. This technique adds visual interest and complexity to the quilt top, enhancing the overall design. By repeating this process and varying the colors of the strips and corners, you can achieve a striking effect that complements the panels beautifully.
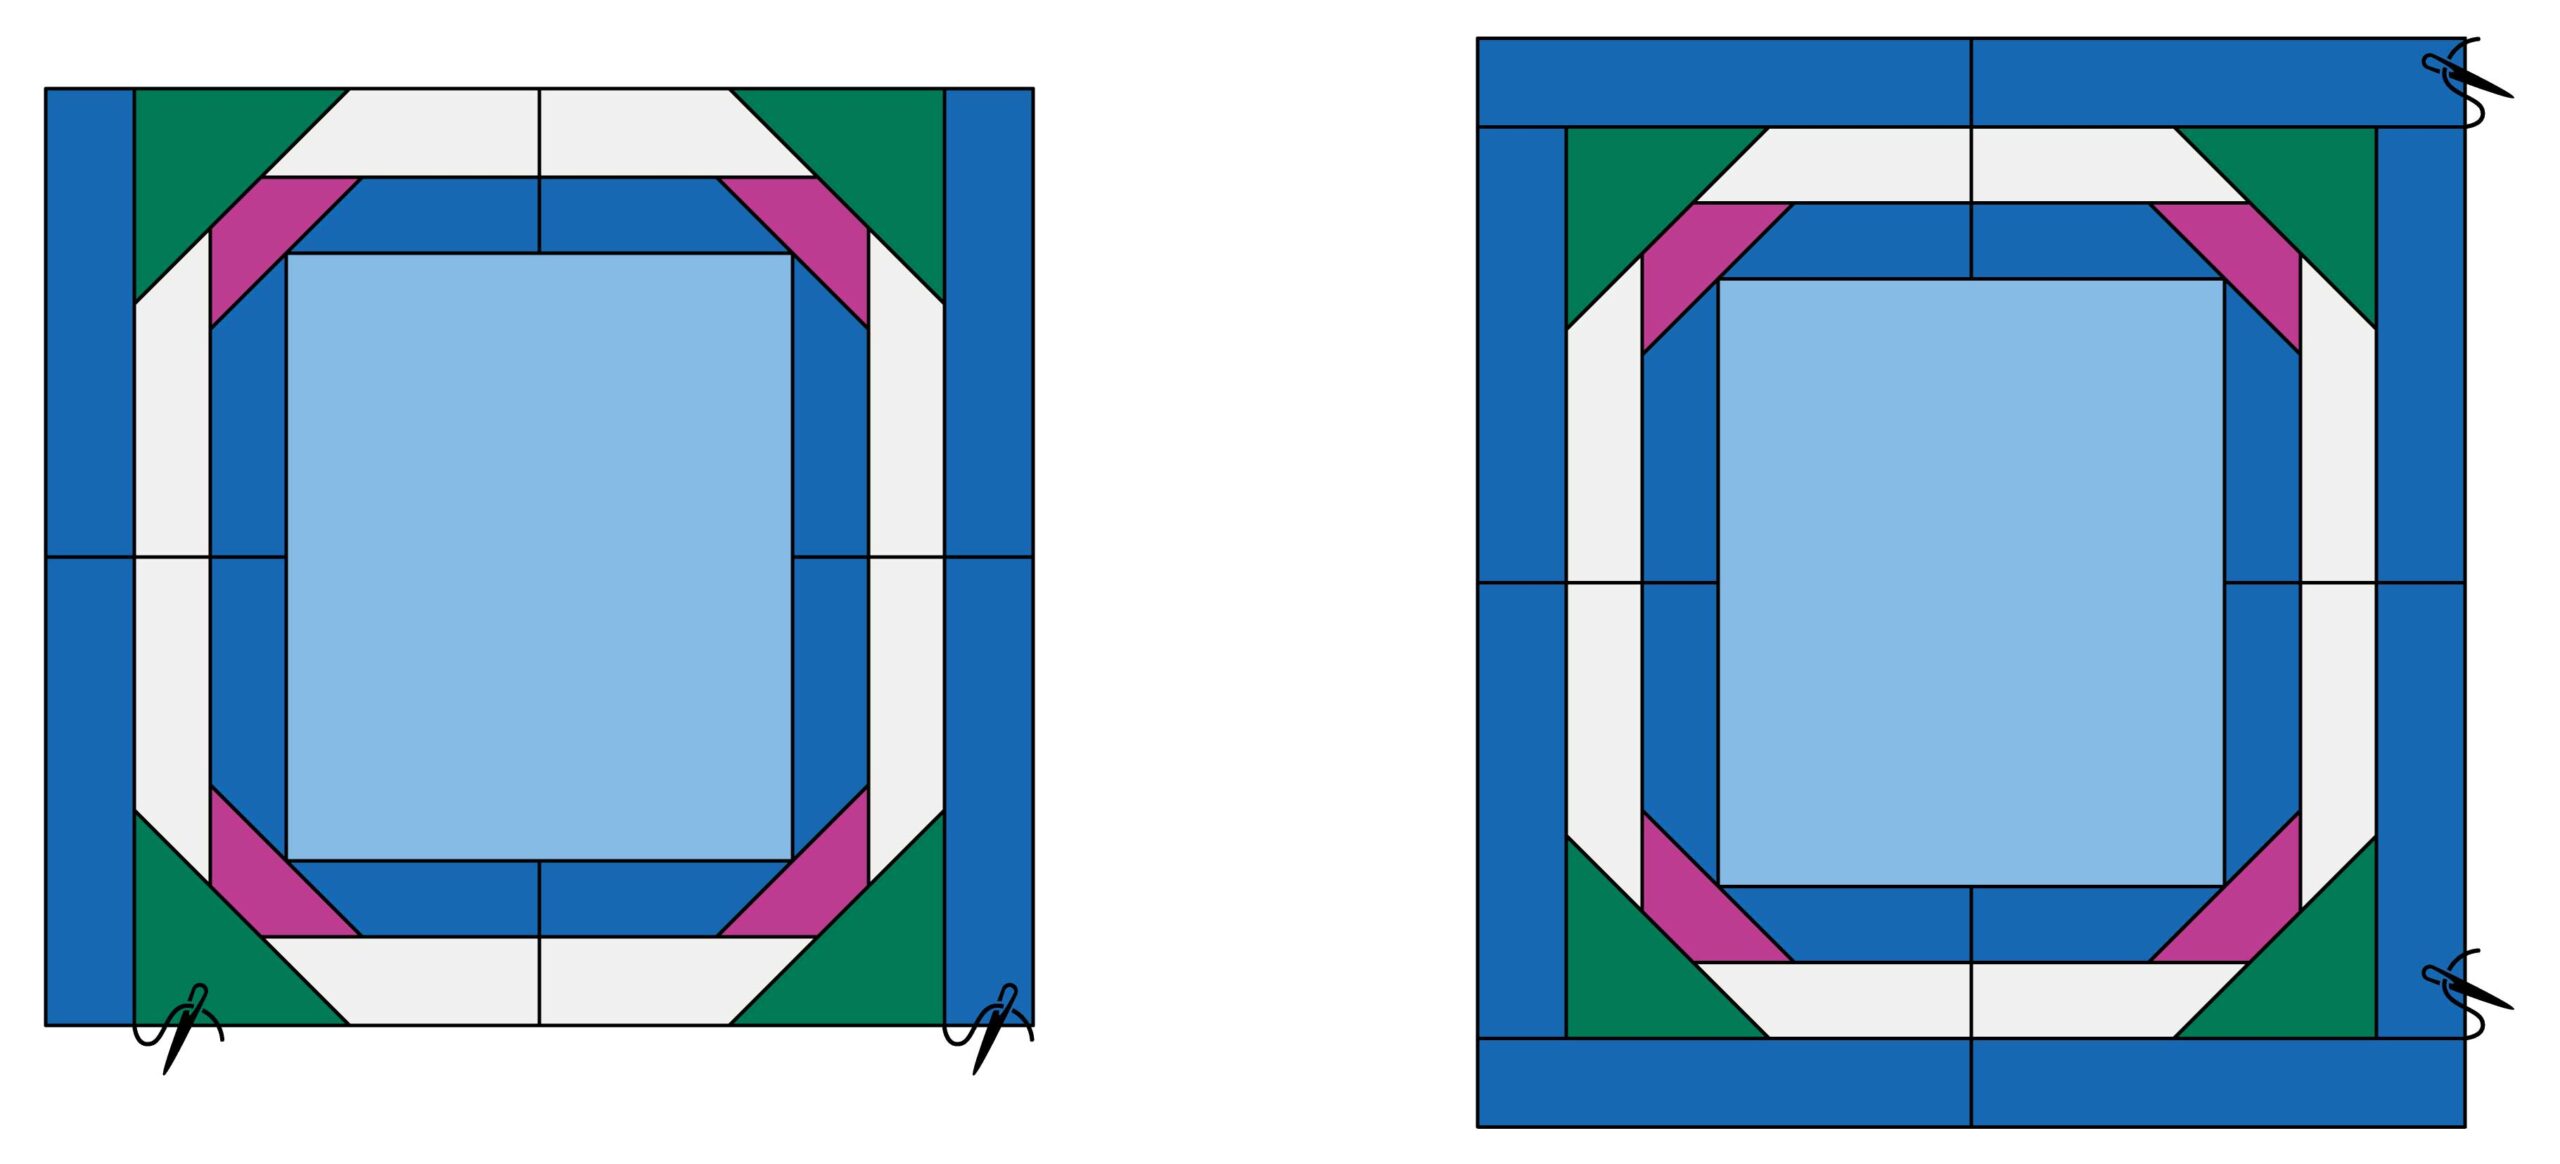
- Begin by sewing 2 like sized pieces RST (right sides together) along the short edges. Press seams open.
- For example, sew the Silhouettes Cloud 2″ x 8″ RST with the Text Cloud 2″ x 8″ pieces. You’ll continue this same process until you have a like sized pieces sewing together as displayed in graphic below. Once all sewn together separate into piles from smallest length to longest length, for ease in sewing next steps.
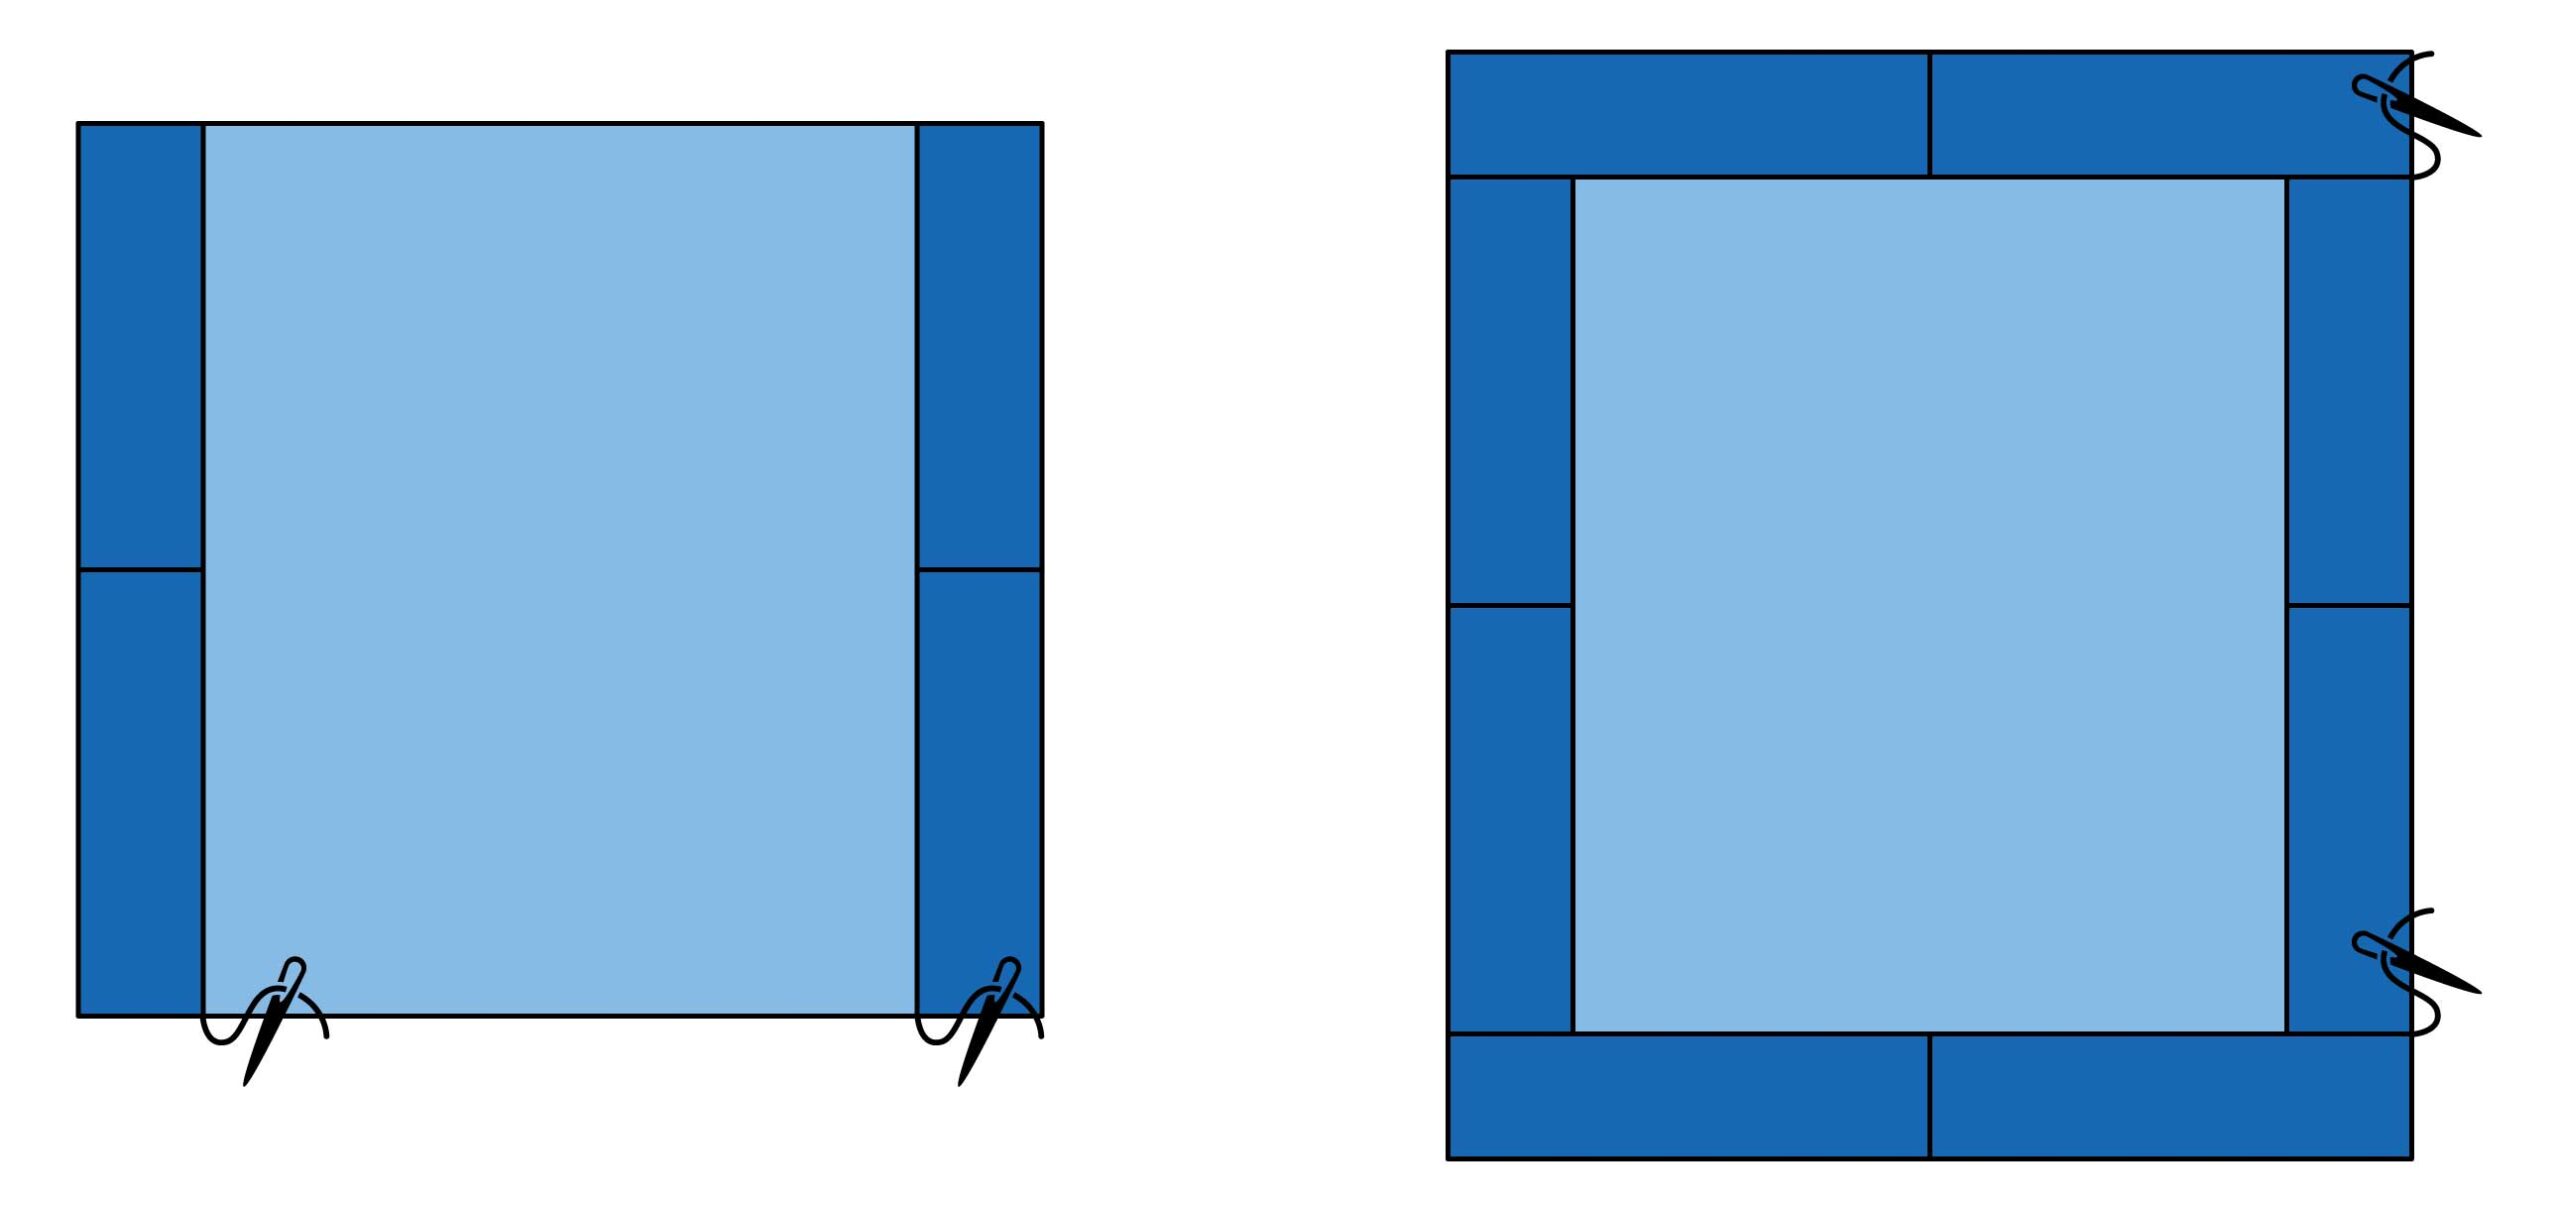
- With trimmed panels, if not trimmed yet please trim to 10-1/2″ x 12-1/2″. Sew the smallest Navy length strips [2″ x 12-1/2″] RST along either sides of the 4 panels. Press towards strips.
- Sew the next Navy length strips [2″ x 13-1/2″] RST along the top and bottom edges of Step 2 units. Press towards strips.
- Draw a line diagonally from corner to corner on the wrong side of the Tonal Wine pieces. Place those pieces on each corner of the Step 3 units and sew diagonally along the drawn lines. Trim away a 1/4″ from sewn lines. Press.
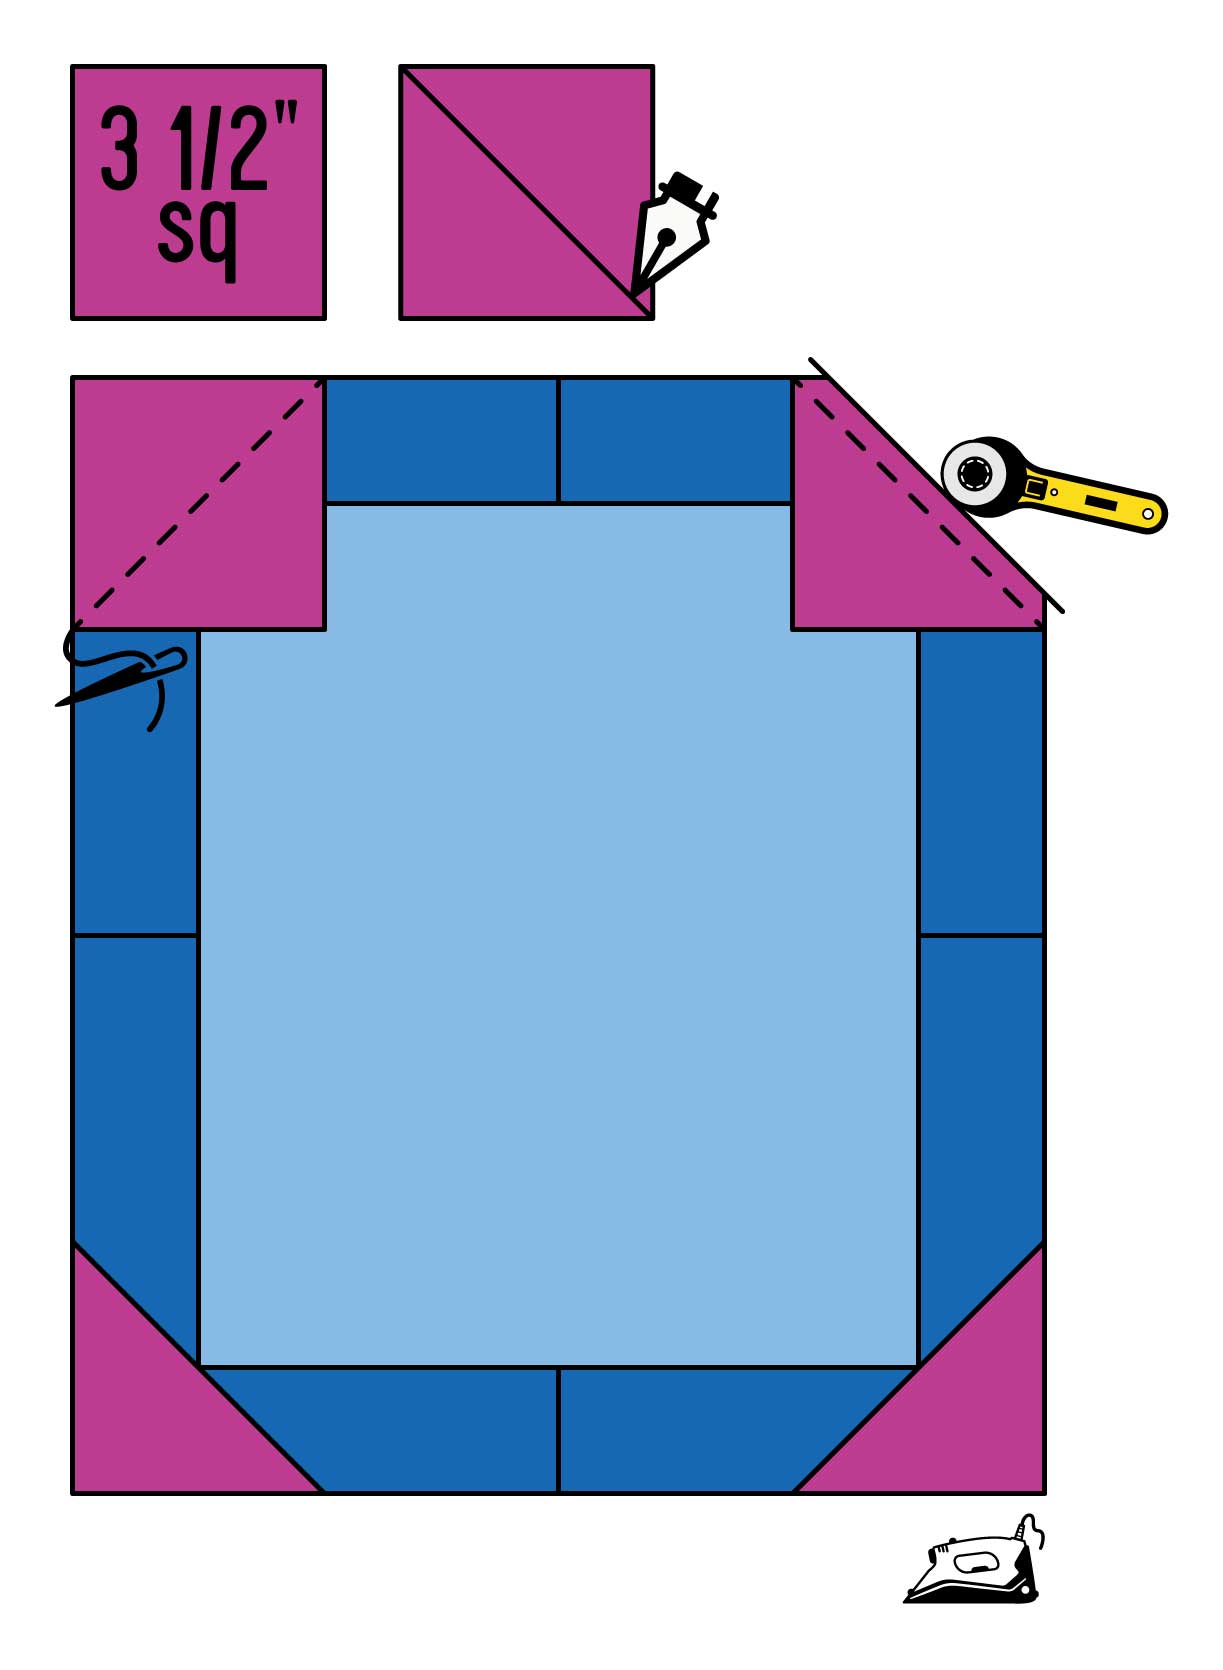
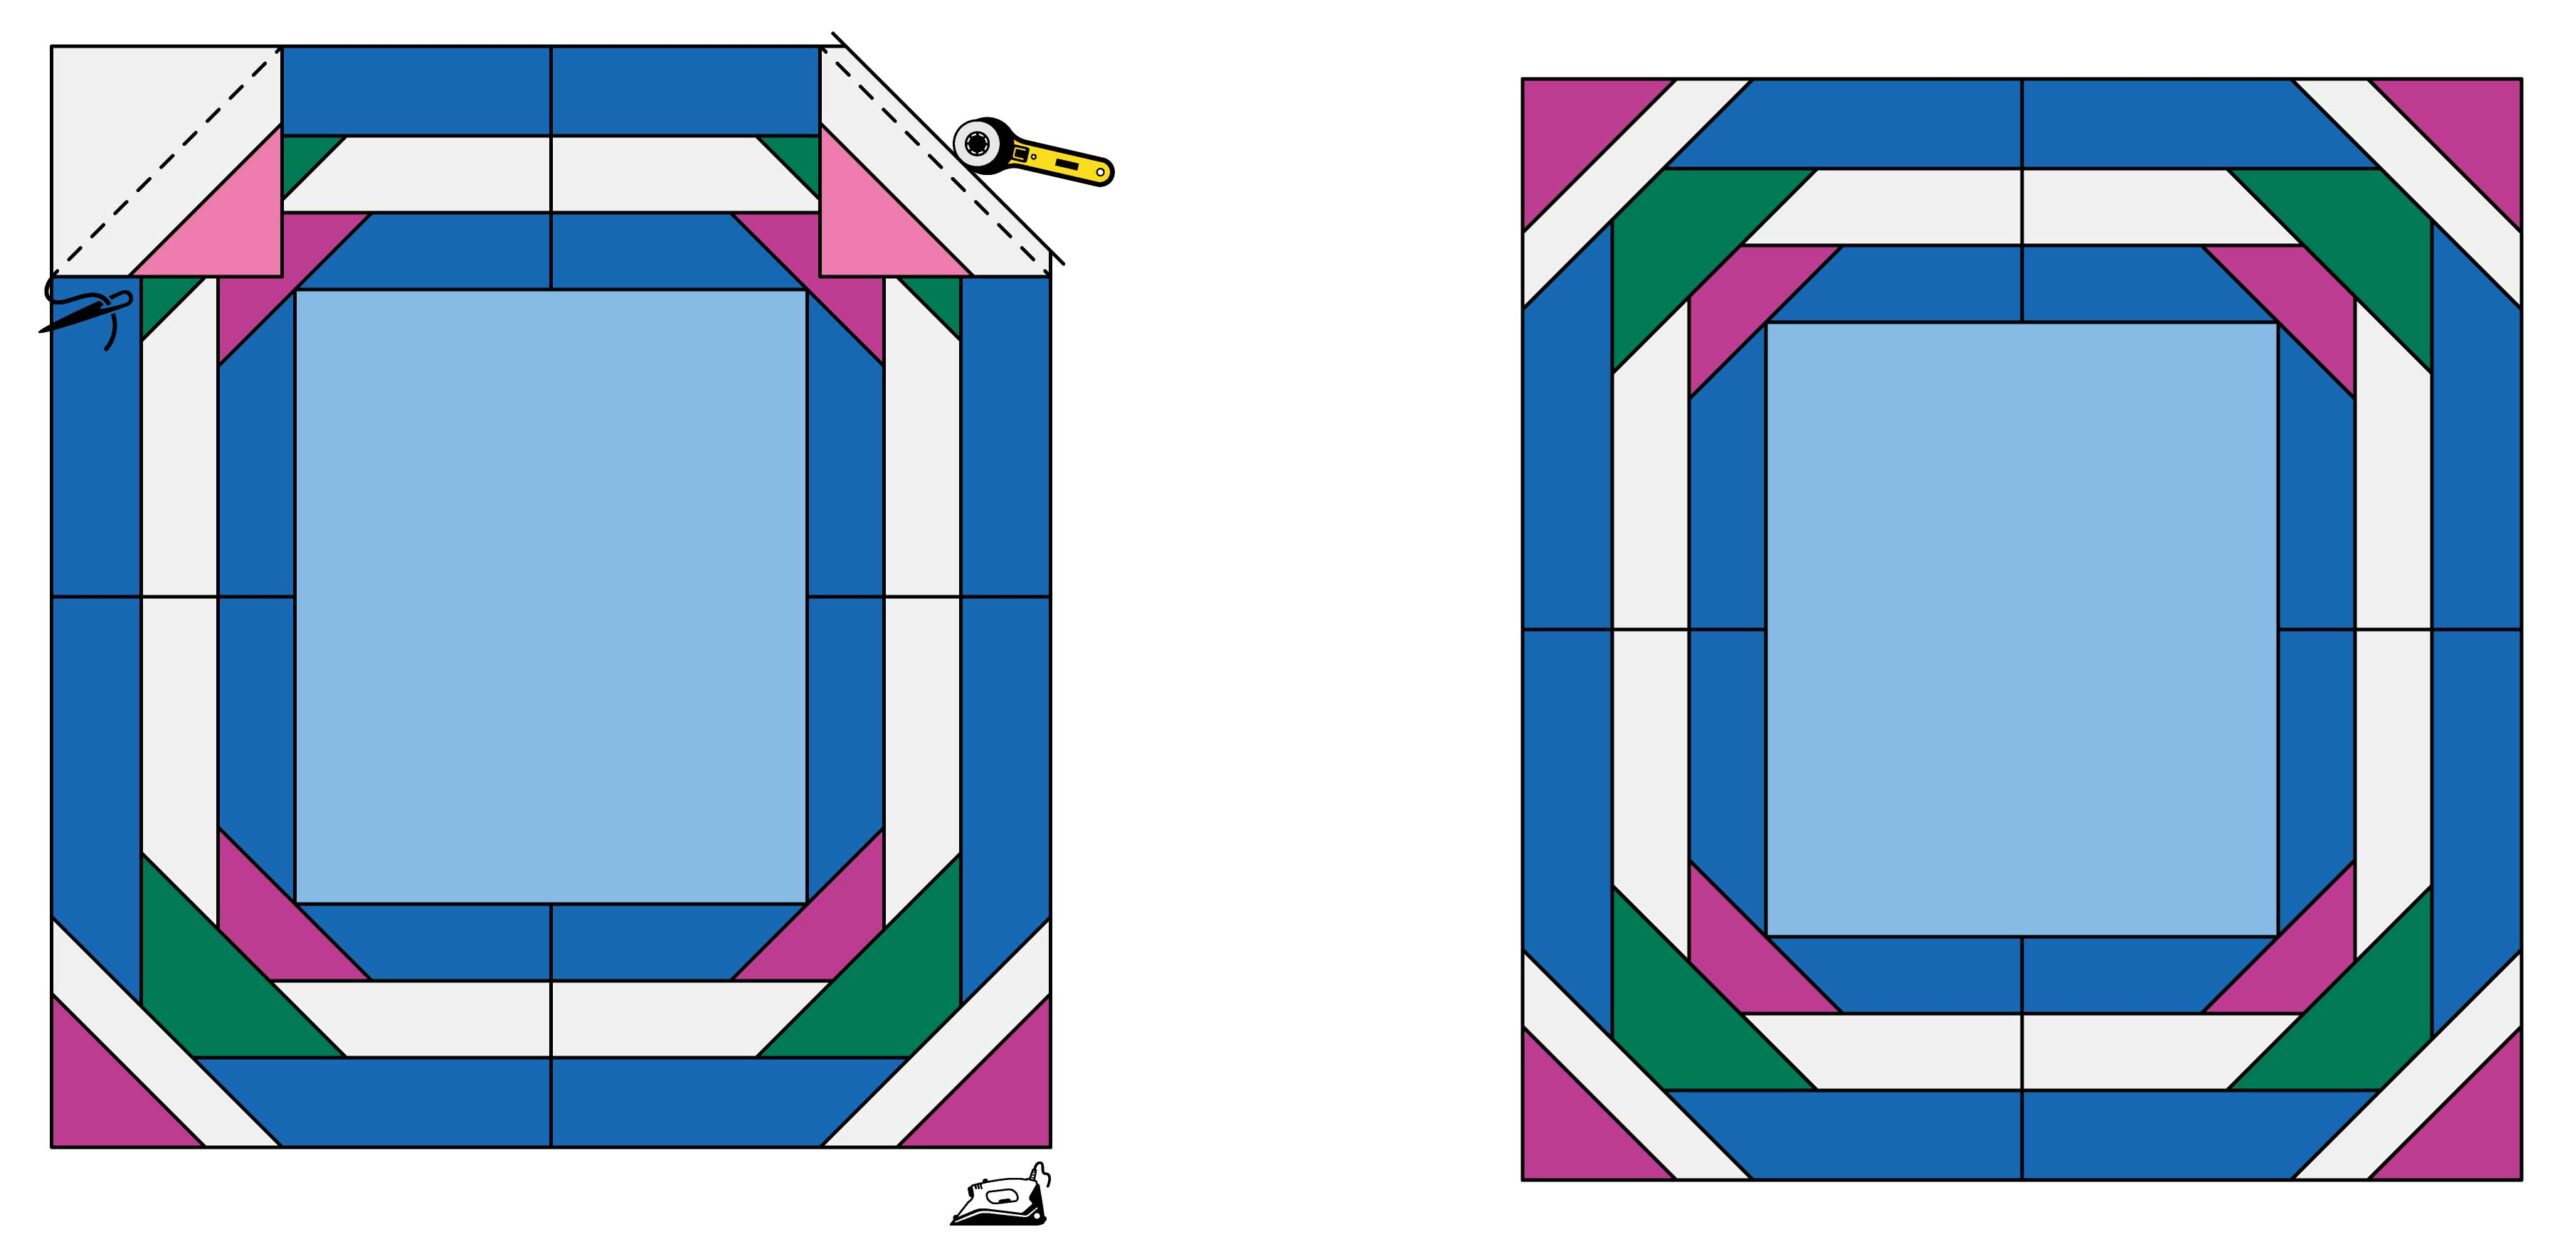
- Sew the smallest Cloud length strips [2″ x 15-1/2″] RST along either sides of the Step 4 units. Press towards strips.
- Sew the largest Cloud length strips [2″ x 16-1/2″] RST along the top and bottom edges of the Step 5 units. Press seams towards strips.
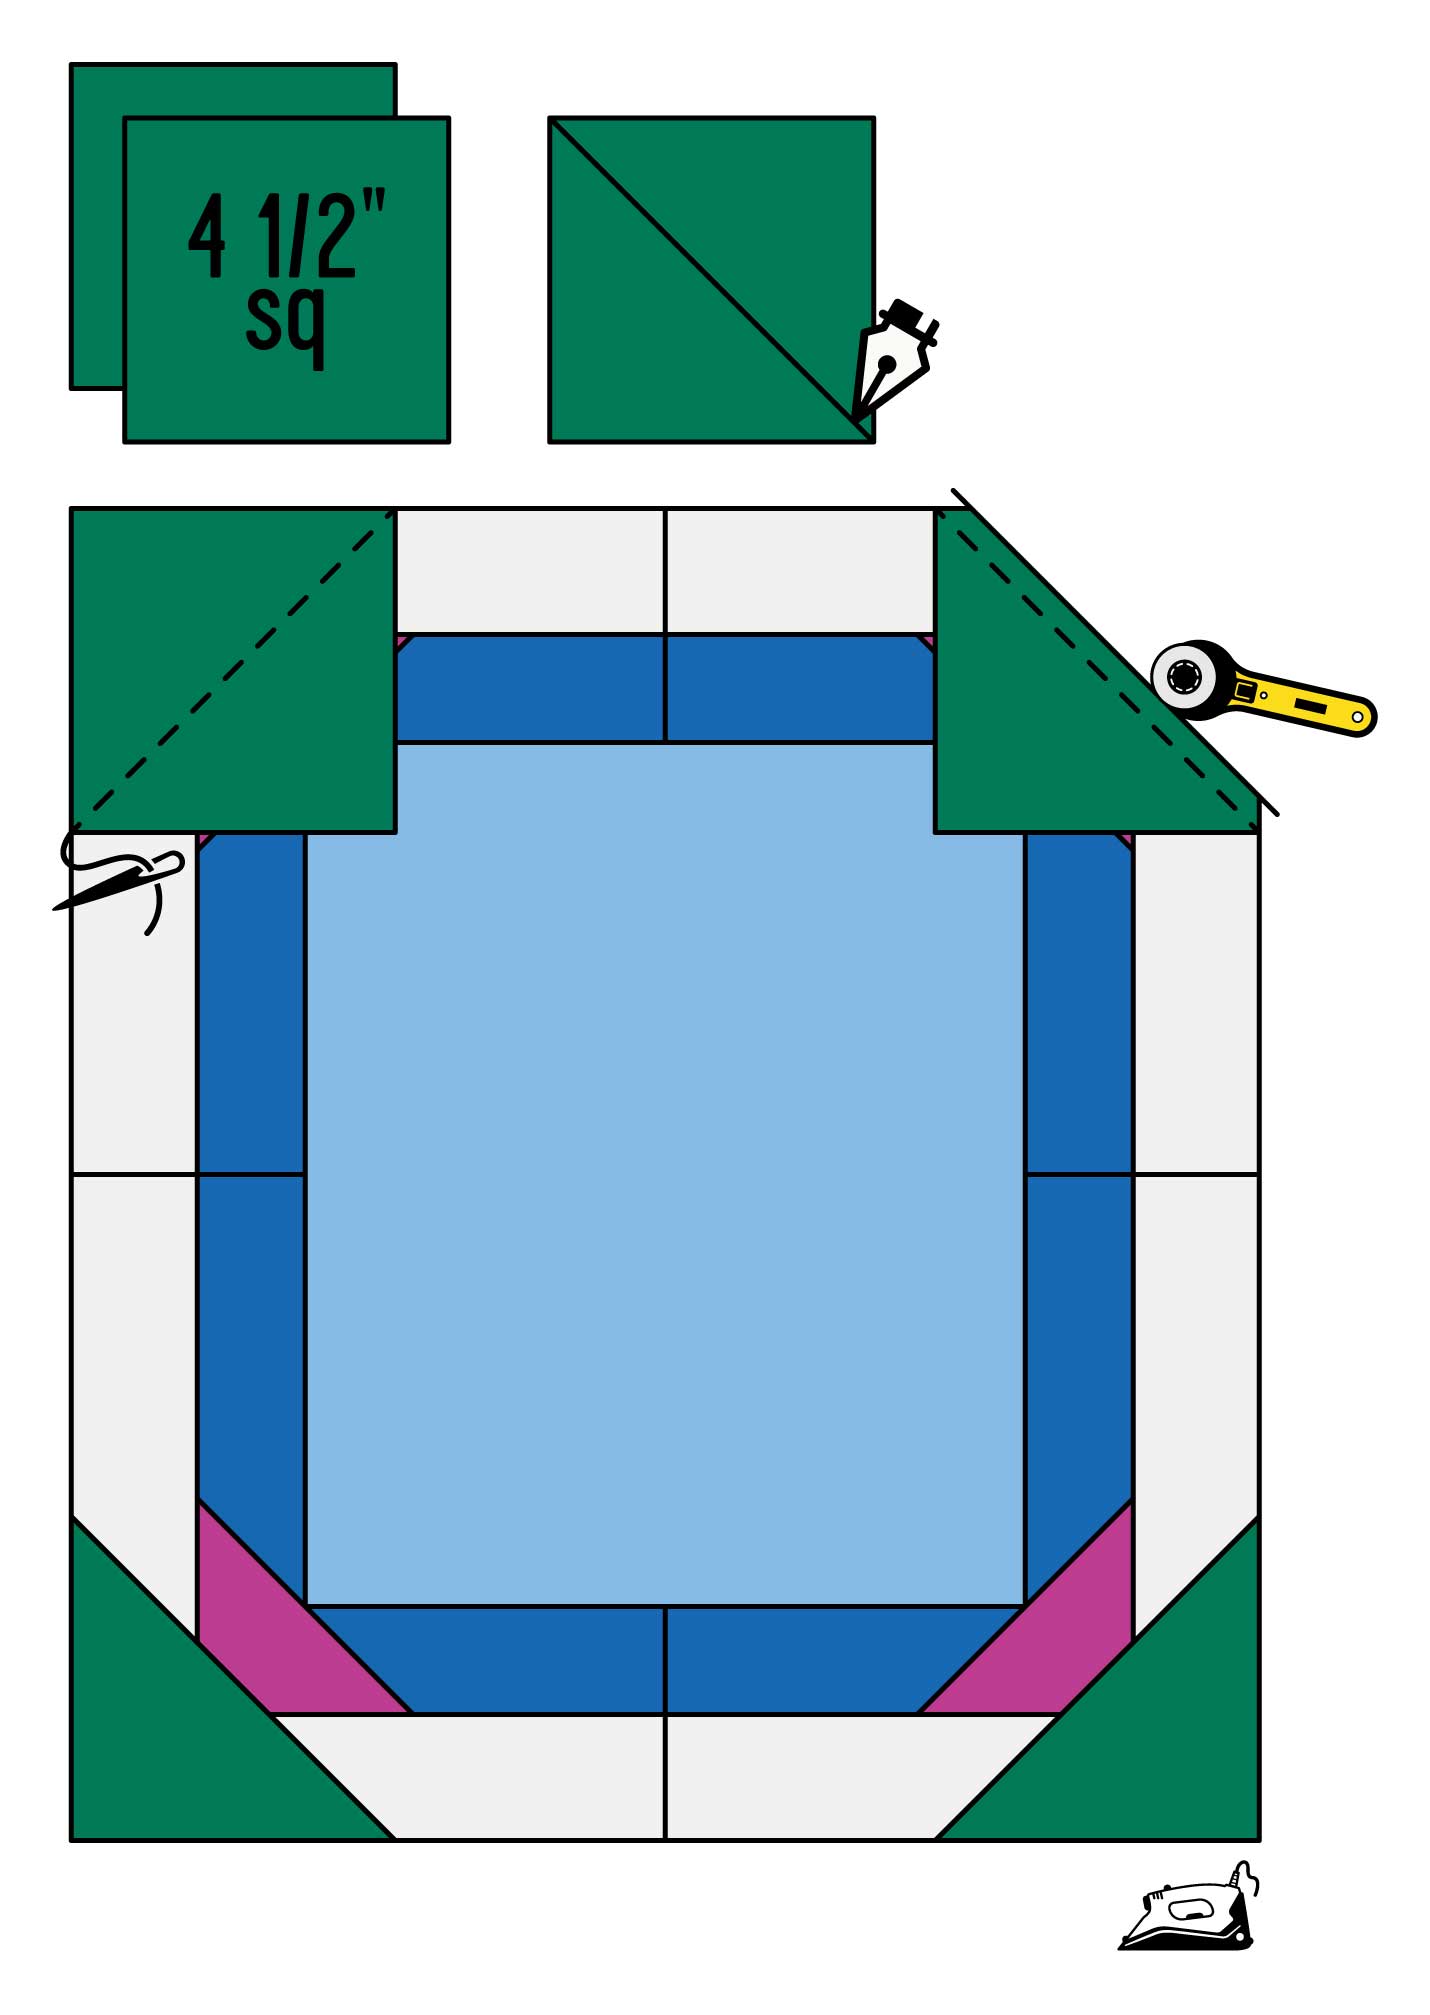
- Draw a line diagonally from corner to corner on the wrong side of the Green pieces. Place those pieces on each corner of the Step 6 units and sew diagonally along the drawn lines. Trim away a 1/4″ from sewn lines. Press.
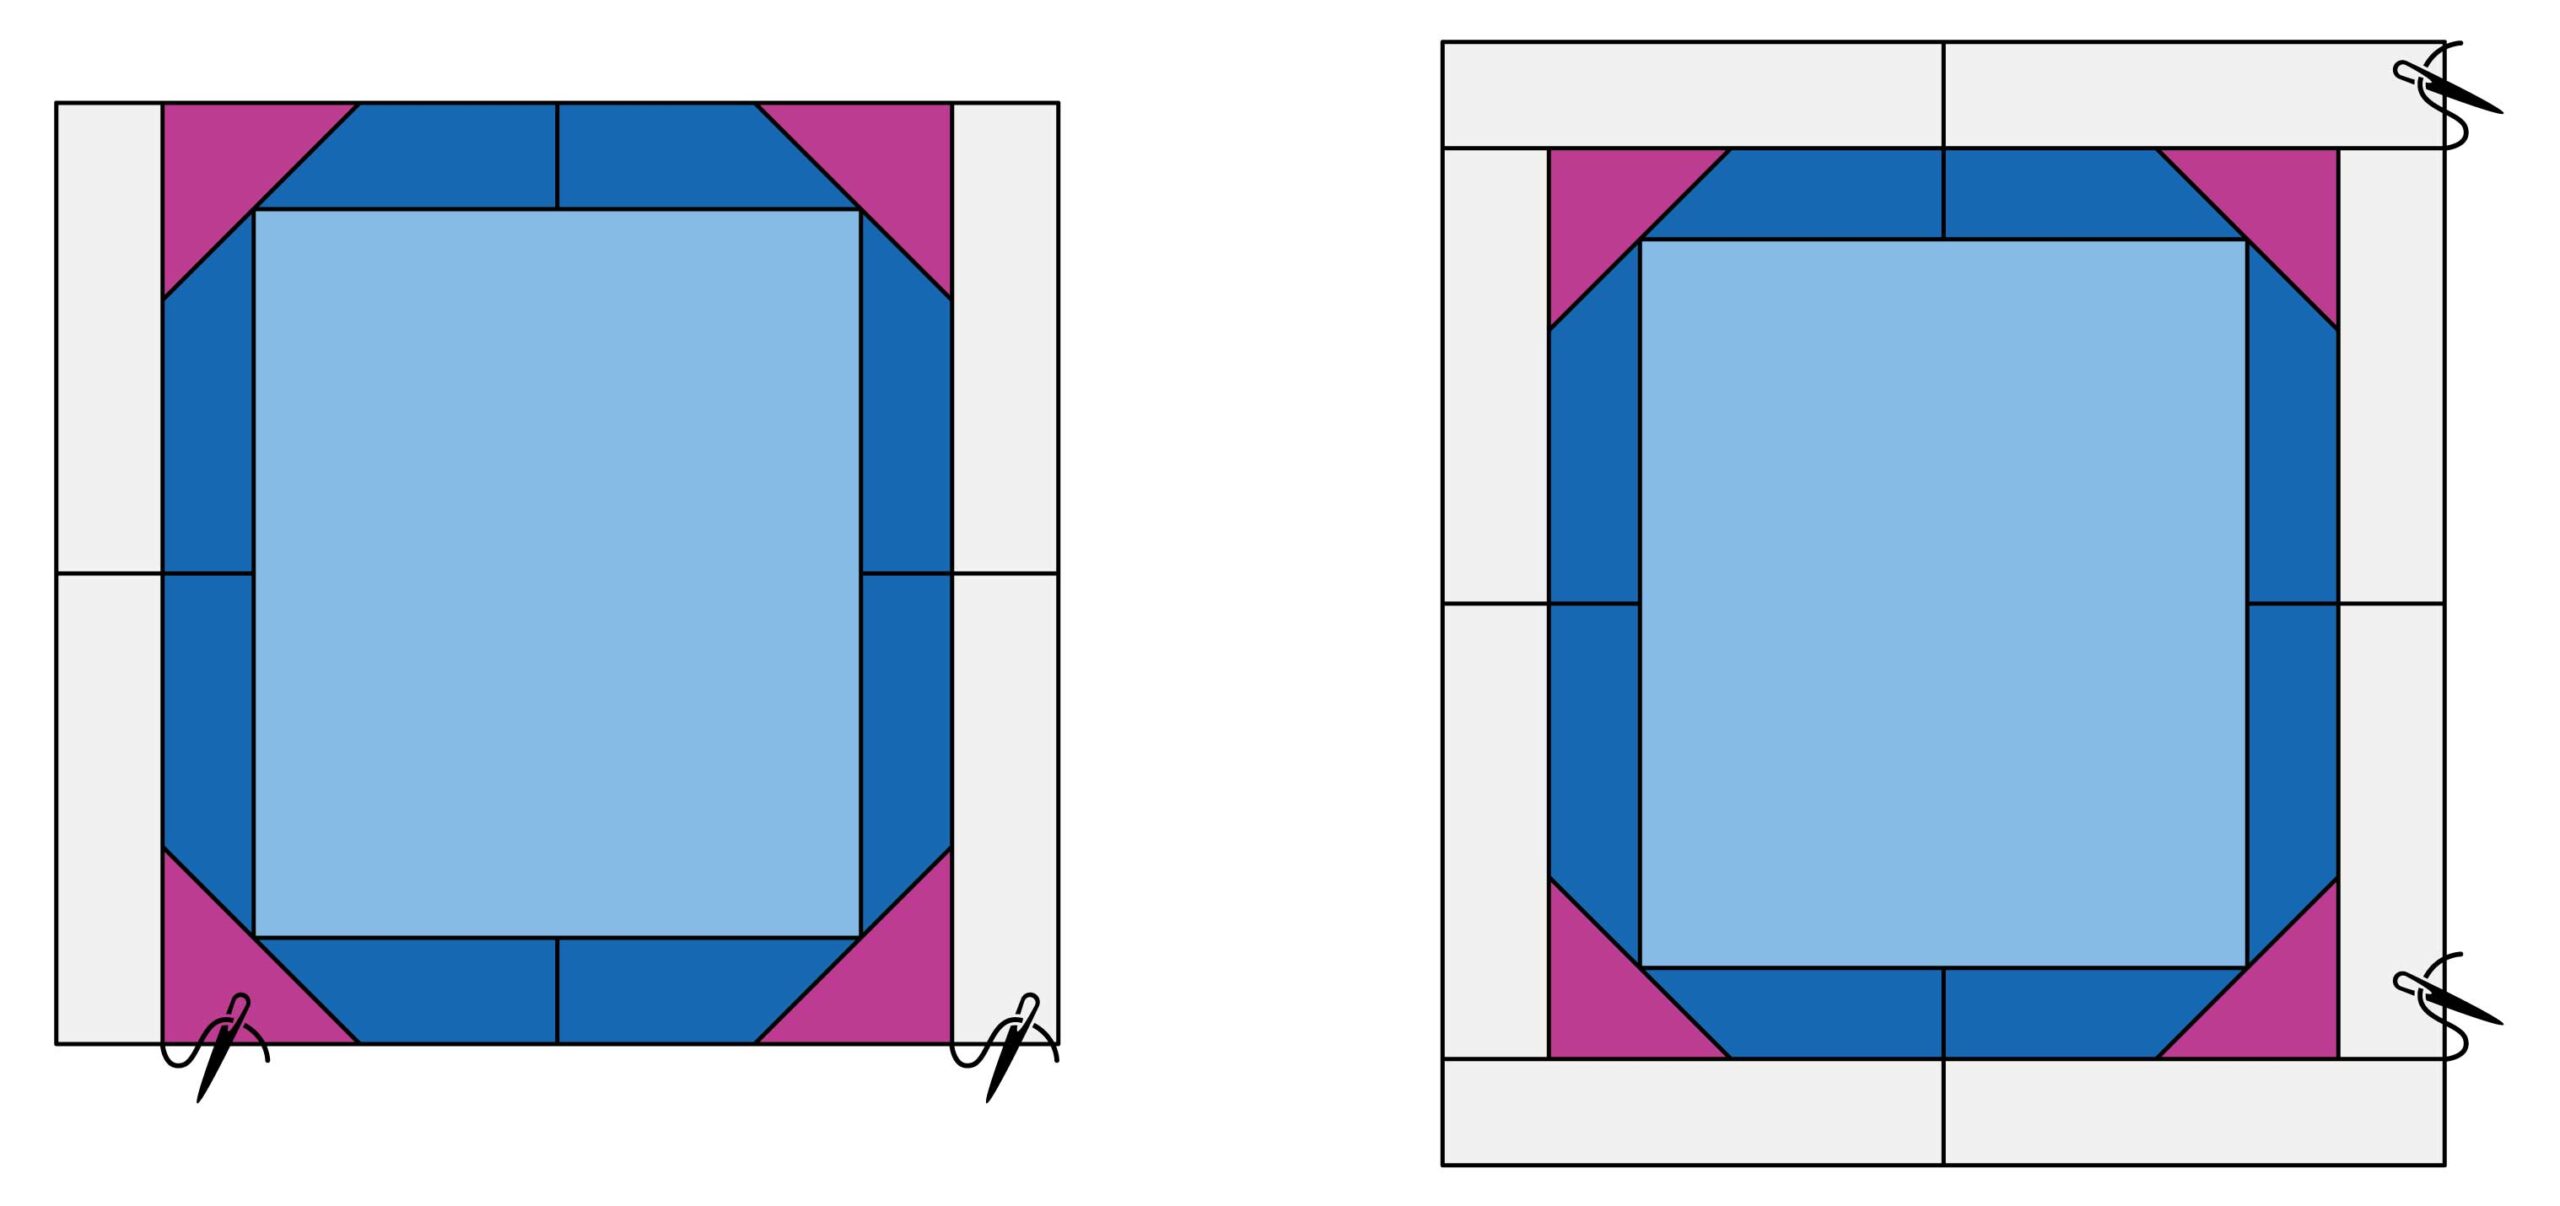
- Sew the next Navy length strips [2″ x 18-1/2″] RST along either sides of the Step 7 units. Press towards strips.
- Sew the last Navy length strips [2″ x 19-1/2″] RST along the top and bottom edges of the Step 8 units. Press towards strips.
- Draw a line diagonally from corner to corner on the wrong side of the Star Wine pieces. Place those pieces RST at a corner of a Star Cloud piece and sew diagonally along the drawn lines. Trim away a 1/4″ from sewn lines. Press.

- Draw a line diagonally from corner to corner on the wrong side of the Star Cloud pieces. Place those pieces on each corner of the Step 9 units and sew diagonally along the drawn lines. Trim away a 1/4″ from sewn lines. Press. [Unfinished Blocks: 19-1/2″ x 21-1/2″]
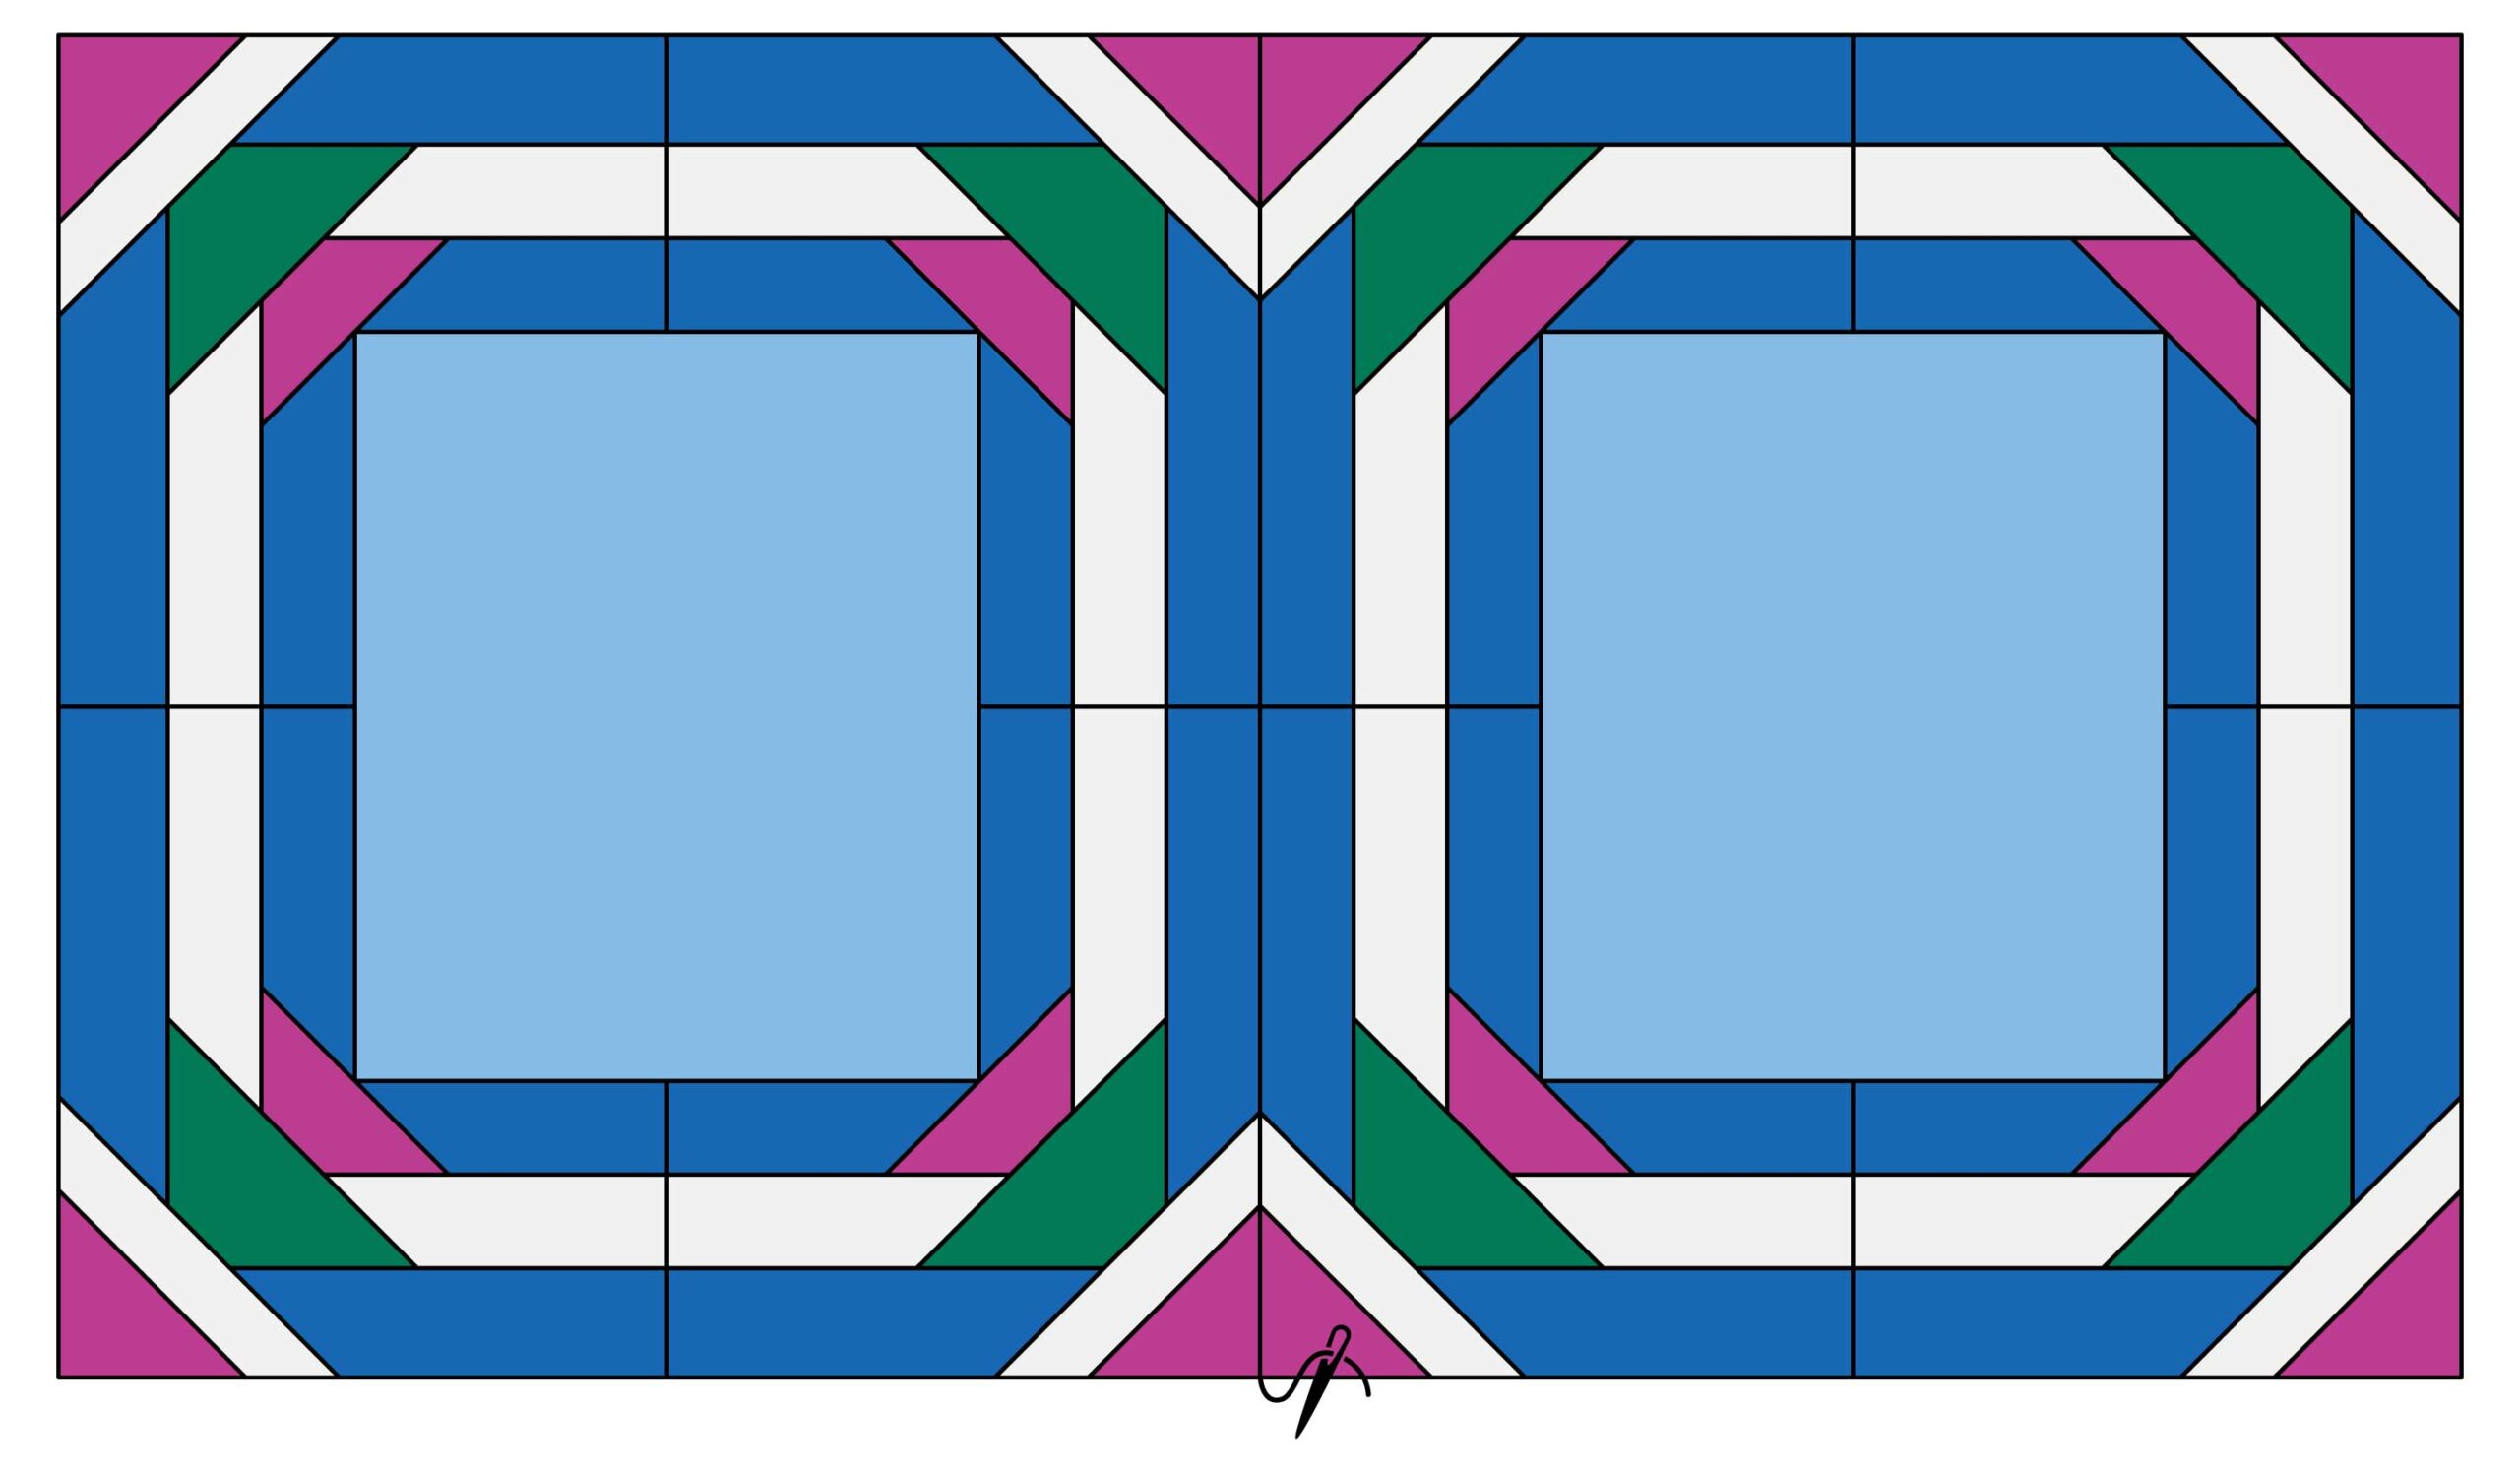
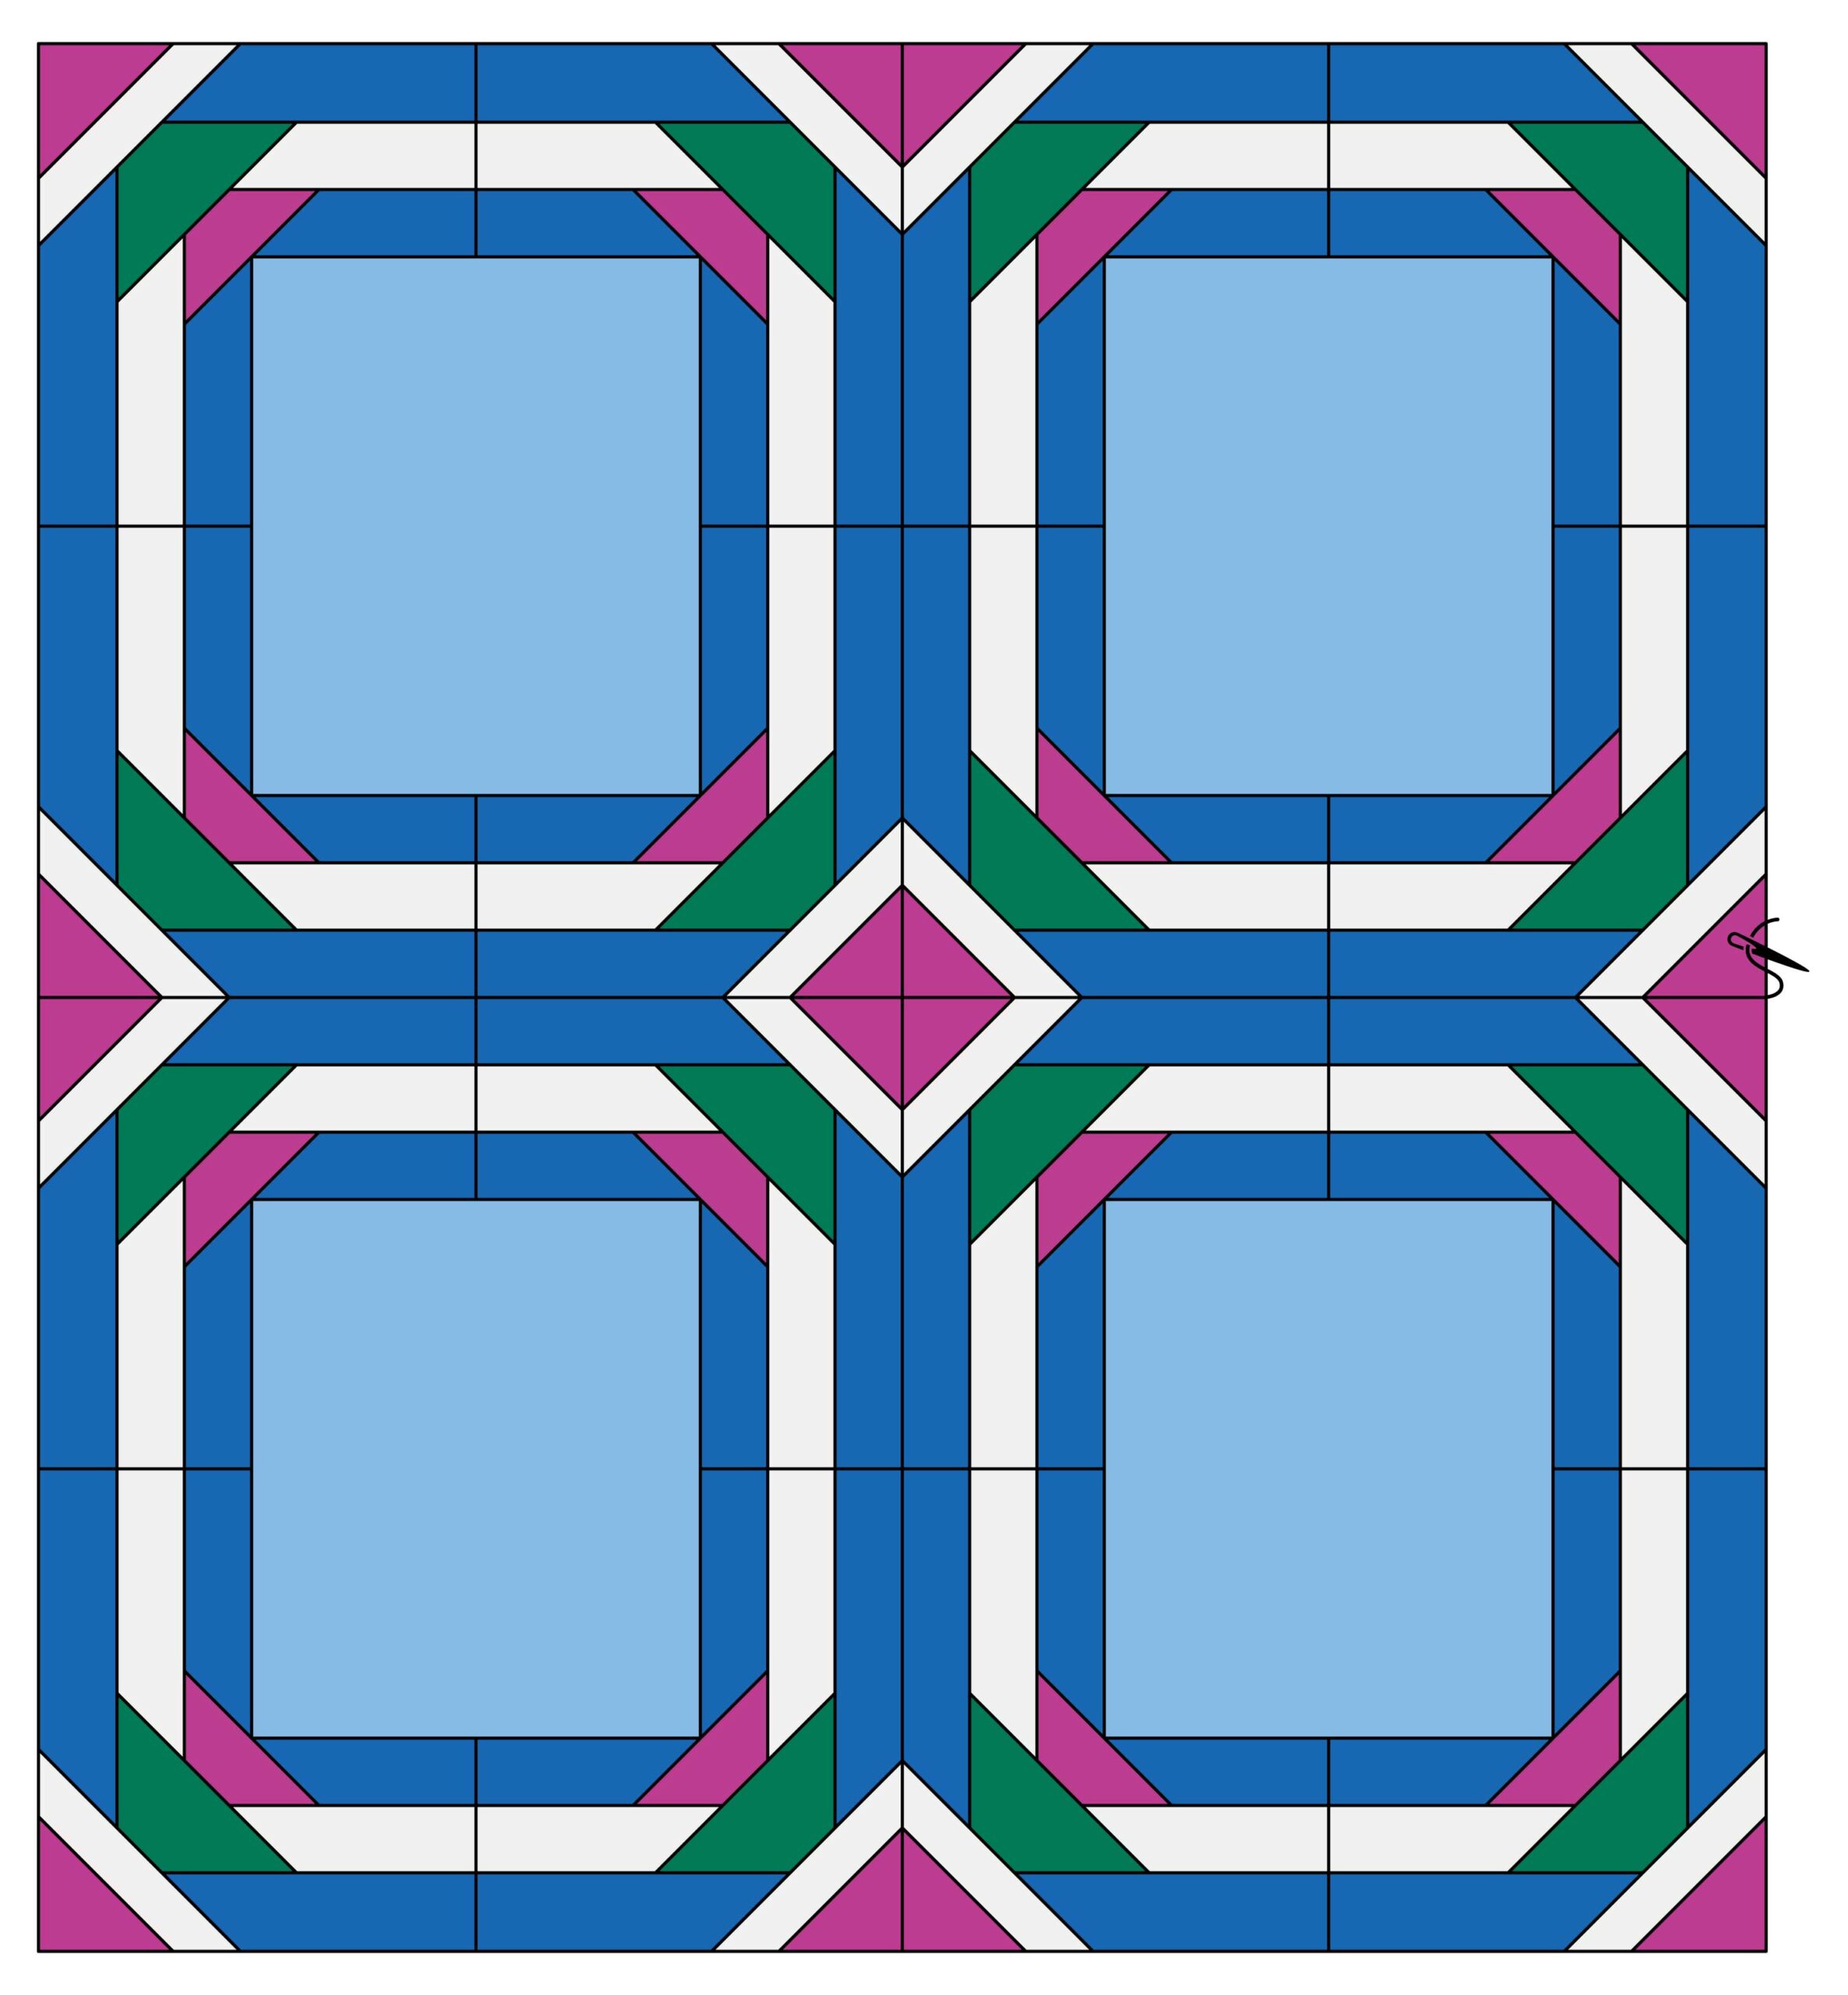
Assembling the Quilt Top
Once you have created the four quilt blocks surrounding the panels, it’s time to assemble the quilt top. Arrange the blocks in a two-by-two manner of your choosing. Sew the blocks RST, to create your unfinished quilt top. Take care to match seams and maintain consistency in your piecing for a polished finish.
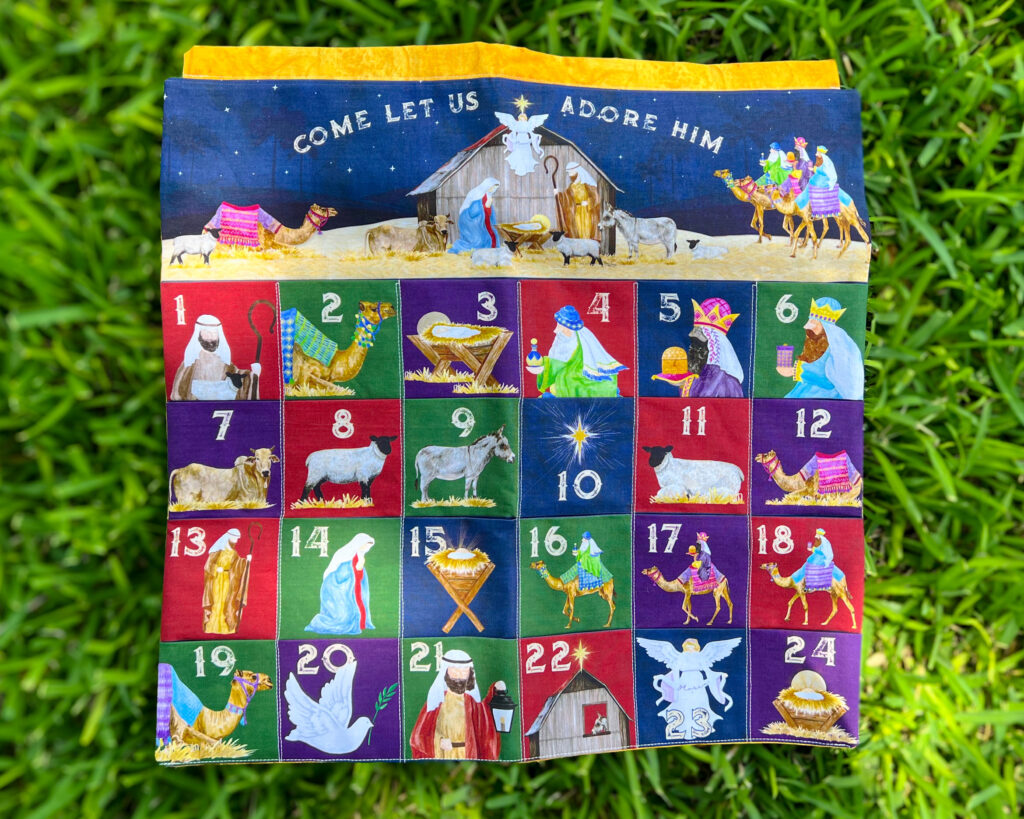
Come Let Us Adore Him, Advent Calendar Panel features how-to assemble instructions.
Finishing Touches
Once your quilt top is complete, it’s time to quilt and bind your masterpiece. You can choose to quilt by hand or machine, depending on your preference. Consider using a simple quilting design that enhances the panel without overpowering it. Finally, bind the edges of your quilt for a clean and finished look.
I hope you enjoyed follow these steps to bring this stunning panel quilt to life, featuring the beautiful Come Let Us Adore Him collection. Happy quilting!

Kelly R. Kirkland (aka. Kelly Renay)
Modern Quilt Designer + Illustrator
For more designs and patterns artfully crafted from a joyful heart, visit my website or follow me on social media by clicking the links below.


You May Also Like
The Peace of Mind Quilt in Love Me More

New Projects on our YouTube Channel!